Introduction
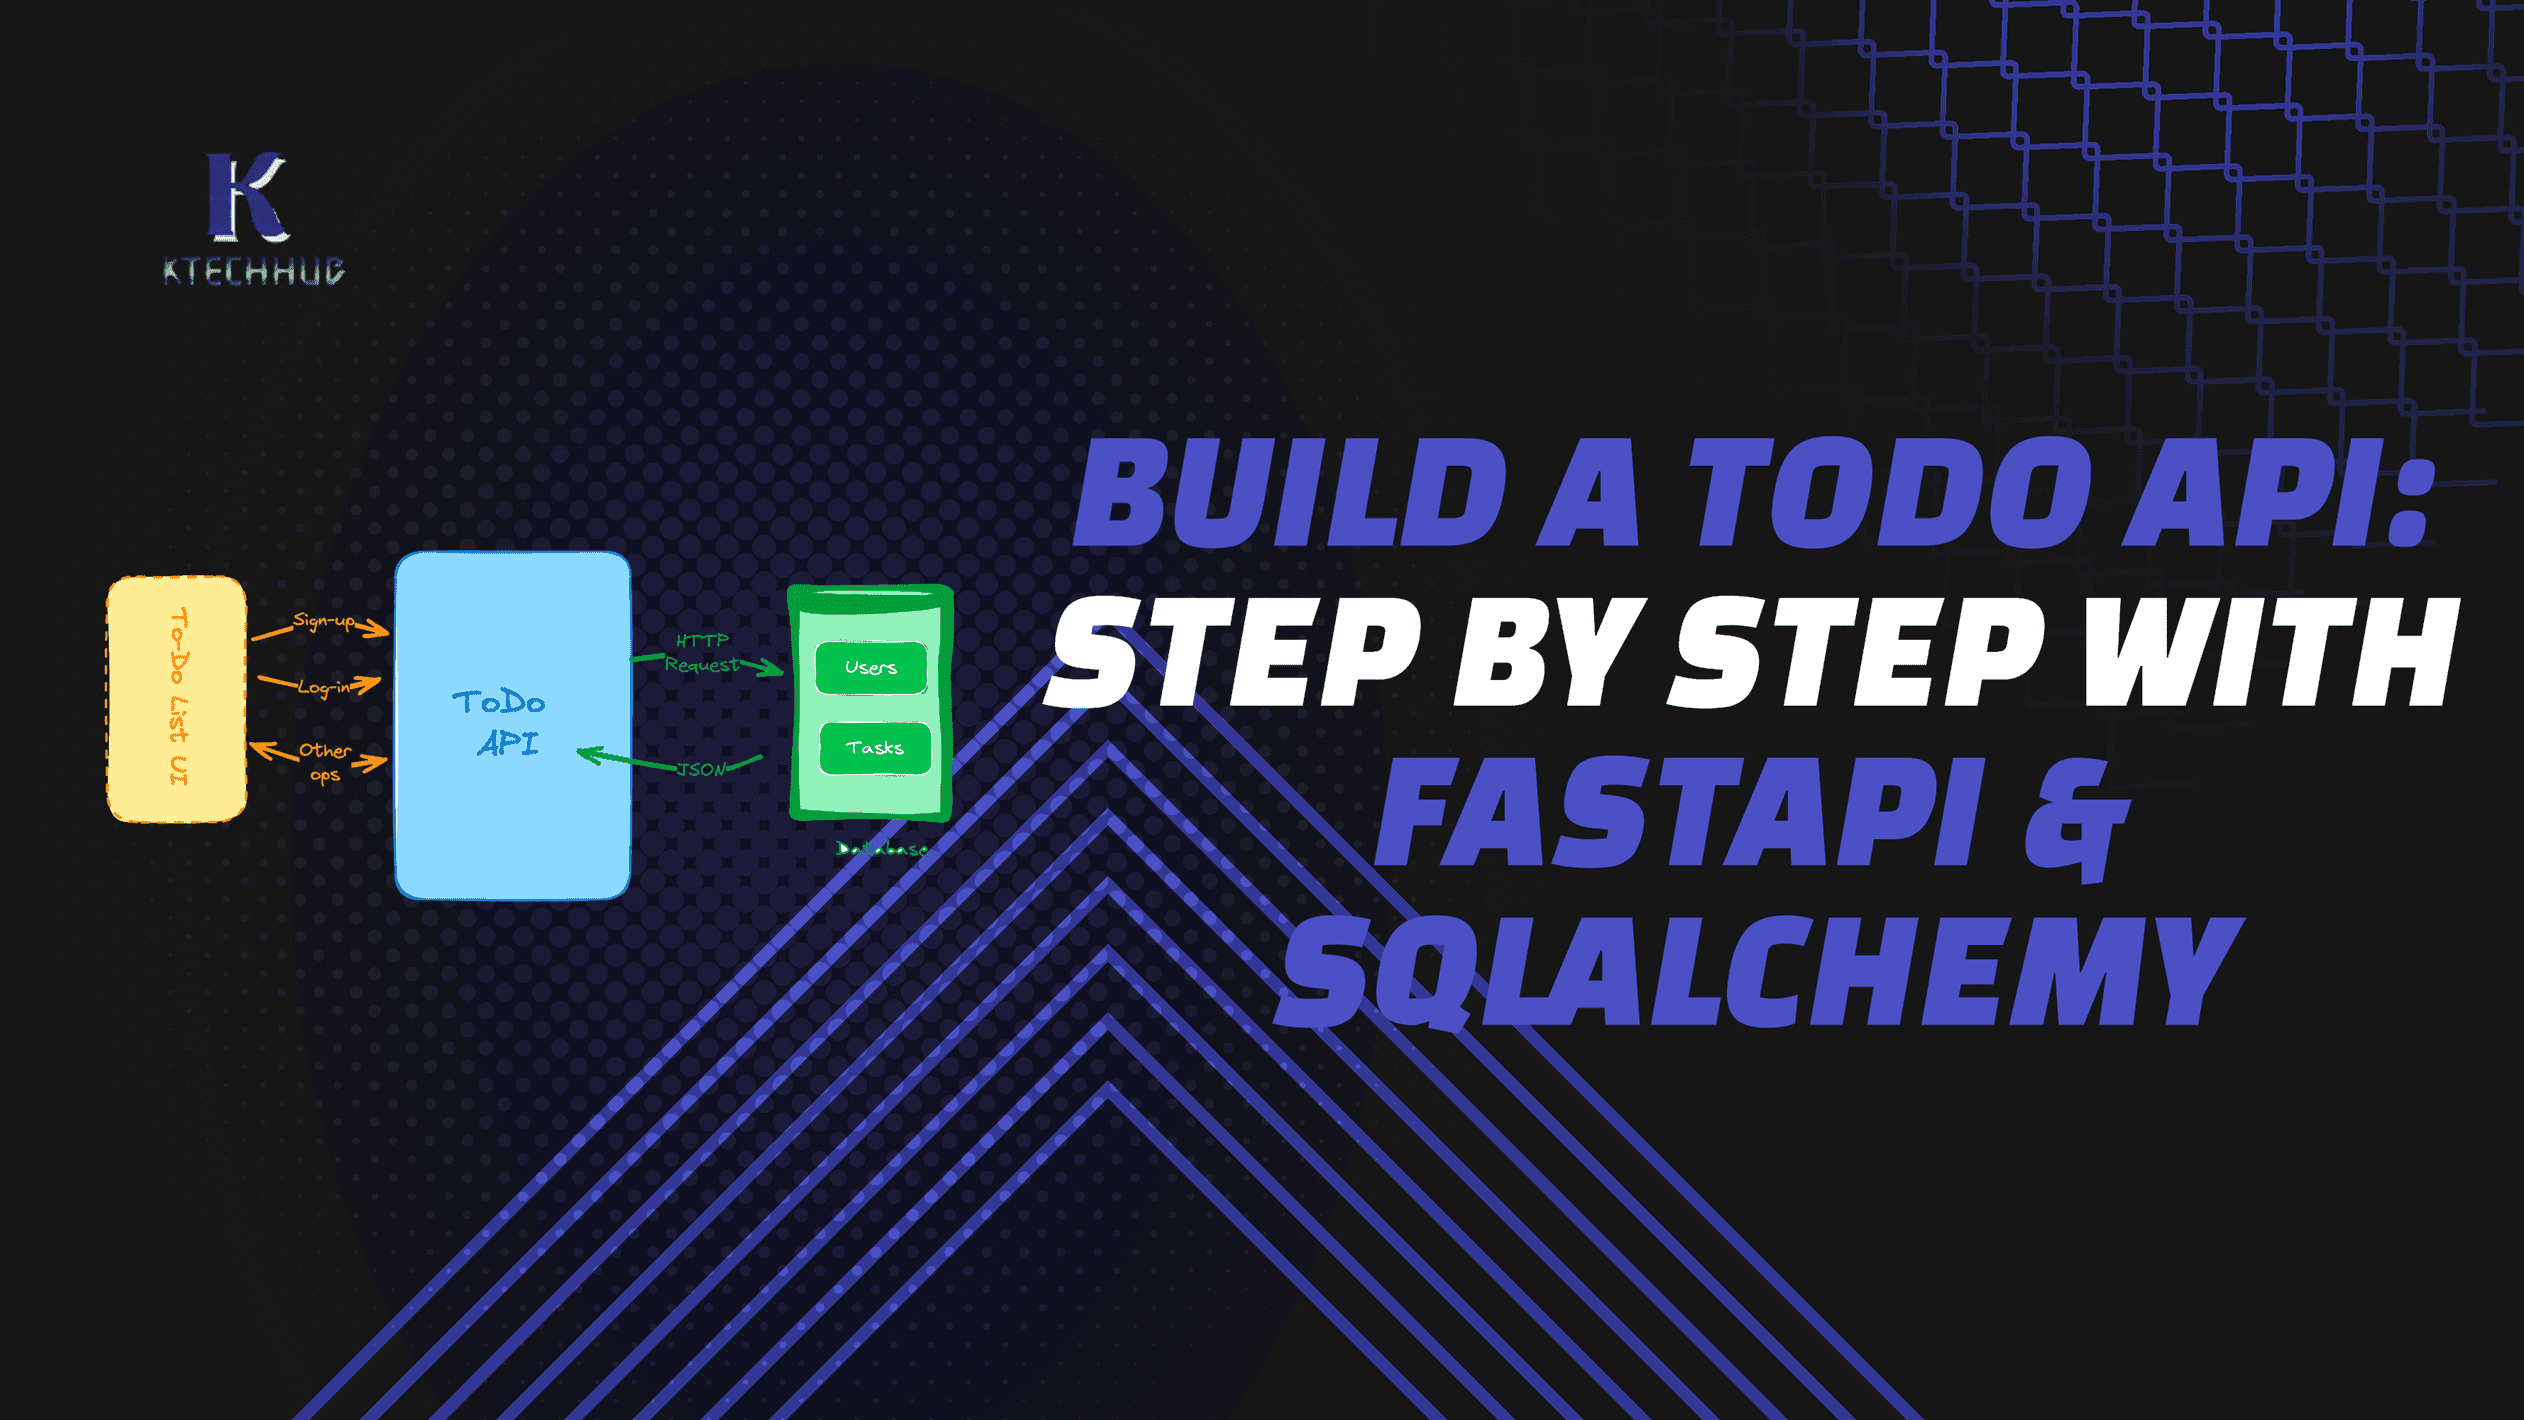
FastAPI, a cutting-edge web framework for building APIs with Python, has revolutionized the world of API development with its speed, simplicity, and automatic documentation capabilities. In this in-depth guide, we will walk you through the process of creating a powerful TODO API using FastAPI. FastAPI's adherence to Python-type hints, automatic data validation, and the ability to generate OpenAPI and JSON Schema documentation make it an excellent choice for developers aiming to build efficient and well-documented APIs.
Whether you are a beginner exploring API development or an experienced developer seeking a modern and high-performance framework, FastAPI has something to offer. Let's dive into the steps of building a TODO API and harness the capabilities of FastAPI to create a robust and scalable solution.
Prerequisites
Before we embark on building our TODO API with FastAPI, ensure that you have the following prerequisites installed on your system:
- Python 3.7 or later: FastAPI requires Python 3.7 or a higher version. You can download Python from the official Python website.
- pip (Python package installer): Ensure that you have pip installed, as it will be used to install FastAPI and other dependencies.
Project Setup
Create a Project Directory:
Open your terminal and create a new directory for your FastAPI project:
mkdir fastapi_todo
cd fastapi_todo
Set Up a Virtual Environment:
Inside your project directory, create a virtual environment. This step is essential for isolating your project's dependencies.
python -m venv venvActivate the Virtual Environment:
Activate the virtual environment based on your operating system:
- On Windows:
venv\Scripts\activate- On macOS and Linux:
source venv/bin/activateInstall FastAPI and Uvicorn:
- FastAPI:
FastAPI is a modern, fast, web framework for building APIs with Python 3.7+ based on standard Python type hints. It is designed to be easy to use and to provide high performance, making it an excellent choice for API development.
pip install fastapiThis command instructs `pip` to download and install the FastAPI package along with its dependencies. Once installed, we can leverage the features of FastAPI to create robust APIs.
- Uvicorn:
Uvicorn is an ASGI (Asynchronous Server Gateway Interface) server that serves as a lightning-fast ASGI server implementation, ideal for running FastAPI applications.
pip install uvicornInstalling Uvicorn ensures that we have a high-performance server to run our FastAPI application. Uvicorn can handle asynchronous requests efficiently, aligning with FastAPI's capabilities for handling asynchronous operations.
- Pydantic:
Pydantic is a data validation and settings management library for Python. It's widely used with frameworks like FastAPI to define and validate data models.
Here are key features of Pydantic:
- Data Validation: Pydantic allows you to define data models using Python type hints. It automatically validates input data against these models, ensuring that it adheres to the specified structure and data types.
- Settings Management: Pydantic extends beyond validation and is also used for managing application settings. You can define a Pydantic model to represent your application's configuration, making it easy to load settings from environment variables, files, or other sources.
- FastAPI Integration: Pydantic plays a central role in FastAPI by providing automatic request and response validation. In FastAPI, Pydantic models are used to define the structure of incoming request data and outgoing response data. This integration promotes clean, type-safe code.
- Type Checking: Pydantic leverages Python's type hinting system. This not only serves for documentation purposes but also enables static type checking tools to catch potential issues early in development.
- Conciseness and Readability: Pydantic models are concise and readable, making it easy to understand the expected structure of data. This simplicity enhances code maintainability and collaboration.
pip install pydantic pydantic-settingsBy running these pip commands inside the virtual environment, we isolate the dependencies for our FastAPI project. This practice ensures that the project's dependencies do not interfere with other Python projects on your system. With FastAPI and Uvicorn installed, we are ready to start building our TODO API using the strengths of FastAPI's asynchronous framework.
Project Folder Structure
Now that we have set up the essential database configuration, let's organize our FastAPI project with a clear folder structure. A well-structured project helps in maintaining code readability, scalability, and ease of collaboration. Below is the proposed folder structure:
.
├── .env
├── .git
├── .gitignore
├── LICENSE
├── README.md
├── app
│   ├── __init__.py
│   ├── api
│   │   ├── __init__.py
│   │   └── v1
│   │       ├── __init__.py
│   │       └── todos
│   │           ├── __init__.py
│   │           ├── create.py
│   │           ├── delete.py
│   │           ├── read.py
│   │           └── update.py
│   ├── core
│   │   ├── __init__.py
│   │   └── config.py
│   ├── database
│   │   └── __init__.py
│   ├── main.py
│   ├── models
│   │   └── __init__.py
│   ├── schemas
│   │   └── __init__.py
│   └── tests
│       └── __init__.py
└── requirements.txt
The folder structure indicates a FastAPI project with a modular and organized design. Let's break down each component:
- .env: This file typically contains environment variables, configuration settings, or secrets for your application. It's often used with a library like `python-dotenv` to load these variables into your application.
- .git: This folder contains all the necessary files for Git version control. It tracks changes to your codebase, facilitates collaboration, and allows you to revert to previous versions if needed.
- .gitignore: This file lists files and directories that should be ignored by Git. Commonly, it includes files like temporary files, logs, and virtual environment directories.
- LICENSE: This file contains the license information for your project, indicating how others can use, modify, and distribute your code.
- README.md: This is typically the main documentation file for your project. It provides an overview, installation instructions, and other relevant information for developers or users.
- app: This is the main folder containing your FastAPI application. o
-
- __init__.py: This file makes the `app` folder a Python package.
- api: This folder holds the API-related modules. o
-
- __init__.py: Makes the `api` folder a Python package.
- v1: Indicates an API version. It might contain various API versions as your project evolves. o
-
- __init__.py: Makes the `v1` folder a Python package.
- todos: Represents a specific API endpoint related to todos. o
-
- __init__.py: Makes the `todos` folder a Python package.
- create.py, delete.py, read.py, update.py: These files likely contain the CRUD (Create, Read, Update, Delete) operations for the todos API endpoint.
- core: This folder holds core configurations and settings for your application. o
- __init__.py: Makes the `core` folder a Python package.
- config.py: Contains configuration settings for your FastAPI app, such as database configurations or API settings.
- database: This folder could be used to store database-related files or configurations. o
- __init__.py: Makes the `database` folder a Python package.
- main.py: The entry point of your FastAPI application. It typically contains the FastAPI app instance and other setup.
- models: Contains data models for your application.
- schemas: Contains Pydantic schemas used for data validation.
- tests: For storing your test files
- requirements.txt: Lists the Python packages and their versions required for your project. This file is often used with `pip` to install dependencies.
This structure promotes modular design, making it easier to organize, maintain, and extend your FastAPI application. Each component has a specific responsibility, contributing to the overall organization and readability of your codebase.
Deploy MySQL Database with Docker
Before we dive into building our FastAPI application, let's set up a MySQL database using Docker. This will provide us with a convenient and isolated environment for development.
docker run --name fastapi_todo -d \
    -p 3306:3306 \
    -e MYSQL_ROOT_PASSWORD=fastapi_todo \
    -e MYSQL_USER=fastapi_todo \
    -e MYSQL_PASSWORD=fastapi_todo \
    -e MYSQL_DATABASE=fastapi_todo \
    mysql:latest
Explanation of the options:
- `--name fastapi_todo`: Specifies the name of the Docker container as "fastapi_todo".
- `-d`: Runs the container in the background (detached mode).
- `-p 33066:3306`: Maps port 3306 of the container to port 33066 on your host machine.
- `-e MYSQL_ROOT_PASSWORD=fastapi_todo`: Sets the root password for MySQL.
- `-e MYSQL_USER=fastapi_todo`: Creates a MySQL user named "fastapi_todo".
- `-e MYSQL_PASSWORD=fastapi_todo`: Sets the password for the MySQL user.
- `-e MYSQL_DATABASE=fastapi_todo`: Creates a MySQL database named "fastapi_todo".
- `mysql:latest`: Specifies the Docker image to use, in this case, the latest version of the MySQL image from Docker Hub.
Now, you have a MySQL server ready to be used by our FastAPI application. In the upcoming sections, we'll configure our FastAPI app to interact with this MySQL database. Let's get started!
Brief Introduction to SQLAlchemy
SQLAlchemy is a popular SQL toolkit and Object-Relational Mapping (ORM) library for Python. It provides a set of high-level API for interacting with relational databases, allowing developers to work with databases in a more Pythonic way.
Now, let's move on to connecting to the MySQL database using SQLAlchemy and the provided credentials.
Connecting to MySQL Database with SQLAlchemy
In our FastAPI project, we'll use SQLAlchemy to interact with the MySQL database. To connect to the database, we need to create a file named `database.py` inside the `app/database` directory.
Install SQLAlchemy
Make sure you have SQLAlchemy installed. If not, you can install it using:
pip install sqlalchemy mysql-connector-pythonCreate `app/database/database.py`
Now, let's create the `database.py` file:
# app/database/database.py
from sqlalchemy import create_engine
from sqlalchemy.orm import sessionmaker
from app.core.config import settings

DATABASE_URL = f"mysql+mysqlconnector://{settings.DB_USER}:{settings.DB_PASSWORD}@{settings.DB_HOST}:{settings.DB_PORT}/{settings.DB_NAME}"

# Creating the SQLAlchemy engine
engine = create_engine(DATABASE_URL)

# Creating the session
SessionLocal = sessionmaker(autocommit=False, autoflush=False, bind=engine)

# Function to get a database session
def get_db():
    db = SessionLocal()
    try:
        yield db
    finally:
        db.close()
Explanation of the code:
- `DATABASE_URL`: This is the URL to connect to our MySQL database. It includes the username, password, host, port, and database name.
- `engine`: This is the SQLAlchemy engine that manages database connections.
- `SessionLocal`: This is a class for creating database sessions.
- `Base`: This is the base class for our models.
- `get_db()`: This is a function that returns a database session.
In the upcoming sections, we'll use this `database.py` file to interact with our MySQL database.
Dont worry about the settings from the core.config file, we'll talk about it later.
Base_class
Create base_class in the `app/database` folder:
# app/database/base_class.py
from sqlalchemy.ext.declarative import declarative_base, declared_attr
from sqlalchemy.orm import DeclarativeMeta


class CustomBase:
    # Generate __tablename__ automatically
    @declared_attr
    def __tablename__(cls):
        return cls.__name__.lower()


Base: DeclarativeMeta = declarative_base(cls=CustomBase)
Now create base.py in database folder. This is where you will add the entry point to all your models to be use with alembic which we would talk about it later.
from app.database.base_class import Base
from app.models.todo import Todo
App CONFIG FIle
# app/core/config.py
from pydantic_settings import BaseSettings


class Settings(BaseSettings):
    API_VERSION: str = "1.0.0"
    CONTACT: dict = {
        "name": "KtechHub FastAPI Demo",
        "url": "https://www.ktechhub.com/",
        "email": "info@ktechhub.com",
    }

    ENV: str = "dev"

    if ENV == "dev":
        RELOAD: bool = True
        LOG_LEVEL: str = "debug"
    else:
        RELOAD: bool = False
        LOG_LEVEL: str = "info"

    ALLOWED_HOSTS: list = ["*"]

    DB_USER: str
    DB_PASSWORD: str
    DB_HOST: str
    DB_PORT: int
    DB_NAME: str

    class Config:
        env_file = "./.env"
        extra = "ignore"


settings = Settings()
This config.py file is defining a Pydantic `BaseSettings` class called `Settings`, which is a way to manage and validate settings for your FastAPI application. Let's break down some of the key elements:
- o
- API_VERSION: The version of the API. In this case, it's set to "1.0.0".
- o
- CONTACT: Information about the contact person or organization associated with the API.
- o
- ENV: The environment in which the application is running. If it's "dev" (development), certain settings like auto-reload and debug logging are enabled.
- o
- RELOAD: If in development mode, this is set to `True`, enabling automatic reloading of the server on code changes.
- o
- LOG_LEVEL: The level of logging for the application. In development, it's set to "debug", and in other environments, it's set to "info".
- o
- ALLOWED_HOSTS: A list of hosts that are allowed to connect to the API. In this case, it's set to `["*"]`, meaning all hosts.
- o
- DB_USER, DB_PASSWORD, DB_HOST, DB_PORT, DB_NAME: Database connection details. These are presumably set in the environment variables or a configuration file.
- o
- Config: This inner class configures the behavior of the Pydantic settings:
- o
- env_file: Specifies the location of the `.env` file, which may contain sensitive information like database credentials.
- o
- extra: Specifies how to handle extra fields in the `.env` file. "ignore" means any extra fields will be ignored.
- o
- settings = Settings(): An instance of the `Settings` class is created, which will be used throughout the FastAPI application to access these settings.
Overall, this configuration file centralizes various settings needed for the FastAPI application, making it easier to manage and maintain. The settings are loaded from environment variables or an `.env` file, providing flexibility and security.
Update your .env file with the following:
API_VERSION=1.0.0

ENV=dev

ALLOWED_HOSTS=["*"]

DB_USER=fastapi_todo
DB_PASSWORD=fastapi_todo
DB_HOST=localhost
DB_PORT=3306
DB_NAME=fastapi_todo
Todo Models
# app/models/todo.py
from sqlalchemy import Column, Integer, String, Boolean, DateTime, func

from app.database.base_class import Base


class Todo(Base):
    __tablename__ = "todos"

    id = Column(Integer, primary_key=True, index=True)
    title = Column(String(120), index=True, )
    description = Column(String(255), index=True, nullable=True)
    is_completed = Column(Boolean, default=False)
    created_at = Column(DateTime, server_default=func.now())
    updated_at = Column(DateTime, server_default=func.now(), onupdate=func.now())

    def __str__(self):
        return f"Todo #{self.id}: {self.title}, Completed: {self.is_completed}"
Explanation of each field:
- id: The primary key for the `Todo` table.
- title: The title of the to-do item.
- description: A description of the to-do item. It's marked as nullable because not all to-dos need a description.
- is_completed: A boolean field indicating whether the to-do is completed or not. It defaults to `False`.
- created_at: The timestamp indicating when the to-do was created. It defaults to the current timestamp when a record is created.
- updated_at: The timestamp indicating when the to-do was last updated. It defaults to the current timestamp when a record is created and is automatically updated whenever the record is modified.
The `Base` class comes from `app/database/database.py` and represents the SQLAlchemy model's base class. It ensures that all models share the same database session and metadata.
Now, you have a `Todo` model that can be used to interact with the database table for storing to-do items.
Alembic
Alembic is a great tool for database migrations in SQLAlchemy-based projects. Here's how you can install Alembic and set it up in your FastAPI app:
Install Alembic:
You can install Alembic using `pip`. Run the following command in your terminal or command prompt:
pip install alembicCreate Alembic Configuration:
Create an Alembic configuration file with the command below:
alembic init alembicThis creates a folder named `alembic` in your project's root directory.
Update the env.py in the alembic folder:
from logging.config import fileConfig

from sqlalchemy import engine_from_config
from sqlalchemy import pool

from alembic import context

from app.database.database import DATABASE_URL
from app.database.base import Base

# this is the Alembic Config object, which provides
# access to the values within the .ini file in use.
config = context.config

# Interpret the config file for Python logging.
# This line sets up loggers basically.
if config.config_file_name is not None:
    fileConfig(config.config_file_name)

# add your model's MetaData object here
# for 'autogenerate' support
# from myapp import mymodel
# target_metadata = mymodel.Base.metadata
target_metadata = Base.metadata

# other values from the config, defined by the needs of env.py,
# can be acquired:
# my_important_option = config.get_main_option("my_important_option")
# ... etc.


def run_migrations_offline() -> None:
    """Run migrations in 'offline' mode.

    This configures the context with just a URL
    and not an Engine, though an Engine is acceptable
    here as well.  By skipping the Engine creation
    we don't even need a DBAPI to be available.

    Calls to context.execute() here emit the given string to the
    script output.

    """
    url = config.get_main_option("sqlalchemy.url")
    context.configure(
        url=url,
        target_metadata=target_metadata,
        literal_binds=True,
        dialect_opts={"paramstyle": "named"},
    )

    with context.begin_transaction():
        context.run_migrations()


def run_migrations_online() -> None:
    """Run migrations in 'online' mode.

    In this scenario we need to create an Engine
    and associate a connection with the context.

    """
    configuration = config.get_section(config.config_ini_section)
    configuration["sqlalchemy.url"] = DATABASE_URL
    connectable = engine_from_config(
        configuration,
        prefix="sqlalchemy.",
        poolclass=pool.NullPool,
    )

    with connectable.connect() as connection:
        context.configure(
            connection=connection, target_metadata=target_metadata
        )

        with context.begin_transaction():
            context.run_migrations()


if context.is_offline_mode():
    run_migrations_offline()
else:
    run_migrations_online()
Generate Initial Migration:
Run the following command to generate an initial migration:
alembic revision --autogenerate -m "initial"This will create a new file in the `alembic/versions` folder. You can customize this file to define your initial database schema.
Apply Migrations:
To apply the migration and create tables in the database, run:
alembic upgrade headThis will apply all migrations.
Now, whenever you make changes to your models, you can generate new migrations and apply them using Alembic.
Anytime you make changes to your models just run:
alembic upgrade head && \
alembic revision --autogenerate && \
alembic upgrade head
Todo Pydantic Schemas
You can create a Pydantic schema to define the structure of the data when interacting with the API. Here's how you can create a `TodoCreate` schema for creating a new todo and a `Todo` schema for reading and updating todos:
from pydantic import BaseModel
from datetime import datetime
from typing import Optional


class TodoBase(BaseModel):
    title: str
    description: Optional[str] = None
    is_completed: Optional[bool] = False


class TodoCreate(TodoBase):
    pass


class TodoUpdate(TodoBase):
    pass


class Todo(TodoBase):
    id: int
    created_at: datetime
    updated_at: datetime

    class Config:
        orm_mode = True
These schemas define the structure of the data that your API will receive (for creating) or return (for reading and updating). The `TodoCreate` schema is used for creating new todos, and the `Todo` schema is used for reading and updating existing todos. The `orm_mode=True` in the `Todo` schema allows you to use it directly with SQLAlchemy models.
Feel free to adjust these schemas based on your specific requirements!
API Endpoints
Let's dive into the todo APIs.
Read File:
In your `app/api/v1/todos/read.py`, you would define the endpoints for reading todos. Here's how you can structure it:
# app/api/v1/todos/read.py
from fastapi import APIRouter, Depends, HTTPException
from sqlalchemy.orm import Session
from app.database.database import get_db
from app.models.todo import Todo
from app.schemas.todo import Todo as TodoSchema
from typing import List

router = APIRouter()


@router.get("/todos/", response_model=List[TodoSchema])
async def read_todos(skip: int = 0, limit: int = 10, db: Session = Depends(get_db)):
    todos = db.query(Todo).offset(skip).limit(limit).all()
    return todos


@router.get("/todos/{id}", response_model=TodoSchema)
async def read_todo(id: int, db: Session = Depends(get_db)):
    todo = db.query(Todo).filter(Todo.id == id).first()
    if todo is None:
        raise HTTPException(status_code=404, detail="Todo not found")
    return todo
This defines two endpoints:
List all Todos: `/todos/`
- This endpoint returns a list of todos. You can use query parameters like `skip` and `limit` to paginate through the results.
Read a Todo by ID: `/todos/{id}`
- This endpoint returns a single todo based on the provided `id`. If the todo with the given ID doesn't exist, it returns a 404 error.
Make sure to import and use the necessary modules and dependencies.
Create File:
In your `app/api/v1/todos/create.py`, you would define the endpoint for creating todos. Here's how you can structure it:
# app/api/v1/todos/create.py
from fastapi import APIRouter, Depends, HTTPException
from sqlalchemy.orm import Session
from app.database.database import get_db
from app.schemas.todo import TodoCreate
from app.schemas.todo import Todo as TodoResponse
from app.models.todo import Todo
from datetime import datetime

router = APIRouter()


@router.post("/todos/", response_model=TodoResponse)
async def create_todo(todo: TodoCreate, db: Session = Depends(get_db)):
    """
    Create a new todo.
    """
    # You can customize this logic based on your requirements.
    db_todo = Todo(
        title=todo.title,
        description=todo.description,
        is_completed=todo.is_completed,
        created_at=datetime.utcnow(),
        updated_at=datetime.utcnow(),
    )

    db.add(db_todo)
    db.commit()
    db.refresh(db_todo)
    return db_todo
- o
db.add(db_todo): Adds the new todo to the database session.- o
db.commit(): Commits the transaction to the database.- o
db.refresh(db_todo): Refreshes the todo with the data from the database.
Update File:
In your `app/api/v1/todos/update.py`, you would define the endpoint for updating todos. Here's how you can structure it:
# app/api/v1/todos/update.py
from fastapi import APIRouter, Depends, HTTPException
from sqlalchemy.orm import Session
from app.database.database import get_db
from app.schemas.todo import TodoUpdate
from app.schemas.todo import Todo as TodoResponse
from app.models.todo import Todo
from datetime import datetime

router = APIRouter()


@router.put("/todos/{id}", response_model=TodoResponse)
async def update_todo(
    id: int, todo: TodoUpdate, db: Session = Depends(get_db)
):
    """
    Update a todo.
    """
    db_todo = db.query(Todo).filter(Todo.id == id).first()

    if not db_todo:
        raise HTTPException(status_code=404, detail="Todo not found")

    for field, value in todo.dict(exclude_unset=True).items():
        setattr(db_todo, field, value)

    db_todo.updated_at = datetime.utcnow()
    db.commit()
    db.refresh(db_todo)

    return db_todo
Delete File:
In your `app/api/v1/todos/delete.py`, you would define the endpoint for deleting todos. Here's how you can structure it:
# app/api/v1/todos/delete.py
from fastapi import APIRouter, Depends, HTTPException
from sqlalchemy.orm import Session
from app.database.database import get_db
from app.models.todo import Todo

router = APIRouter()


@router.delete("/todos/{id}")
async def delete_todo(id: int, db: Session = Depends(get_db)):
    """
    Delete a todo.
    """
    db_todo = db.query(Todo).filter(Todo.id == id).first()

    if not db_todo:
        raise HTTPException(status_code=404, detail="Todo not found")

    db.delete(db_todo)
    db.commit()

    return {"message": "Todo deleted successfully"}
Main Todo File:
In your `app/api/v1/todos/todo.py`, you would define the entry point to all apis:
# app/api/v1/todos/todo.py
from fastapi import APIRouter
from app.api.v1.todos import read, create, update, delete

router = APIRouter()


router.include_router(read.router, prefix="", tags=["todos"])
router.include_router(create.router, prefix="", tags=["todos"])
router.include_router(update.router, prefix="", tags=["todos"])
router.include_router(delete.router, prefix="", tags=["todos"])
Main File:
from fastapi import FastAPI, status
from fastapi.responses import RedirectResponse
from fastapi.middleware.cors import CORSMiddleware
from app.core.config import settings
from app.api.v1.todos import todo

description_text = """
FastAPI TODO API Demo
"""

app = FastAPI(
    title="FastAPI TODO API Demo",
    openapi_url="/openapi.json",
    description=description_text,
    version=settings.API_VERSION,
    contact=settings.CONTACT,
    terms_of_service="https://www.ktechhub.com/terms/",
)

app.add_middleware(
    CORSMiddleware,
    allow_origins=settings.ALLOWED_HOSTS,
    allow_credentials=True,
    allow_methods=["*"],
    allow_headers=["*"],
)


@app.get("/", response_class=RedirectResponse, include_in_schema=False)
async def docs():
    return RedirectResponse(url="/docs")

@app.get("/ready", status_code=status.HTTP_200_OK, include_in_schema=True)
async def ready() -> str:
    """Check if API it's ready"""
    return "ready"


app.include_router(
    todo.router,
    prefix="/api/v1",
    tags=["todos"],
)
Customize as you wish.
Final Folder Structure
.
├── .env
├── .git
├── .gitignore
├── LICENSE
├── README.md
├── alembic
│   ├── README
│   ├── env.py
│   ├── script.py.mako
│   └── versions
│       ├── .gitkeep
│       └── a4d1ef99ffe1_initial.py
├── alembic.ini
├── app
│   ├── __init__.py
│   ├── api
│   │   ├── __init__.py
│   │   └── v1
│   │       ├── __init__.py
│   │       └── todos
│   │           ├── __init__.py
│   │           ├── create.py
│   │           ├── delete.py
│   │           ├── read.py
│   │           ├── todo.py
│   │           └── update.py
│   ├── core
│   │   ├── __init__.py
│   │   └── config.py
│   ├── database
│   │   ├── __init__.py
│   │   ├── base.py
│   │   ├── base_class.py
│   │   └── database.py
│   ├── main.py
│   ├── models
│   │   ├── __init__.py
│   │   └── todo.py
│   ├── schemas
│   │   ├── __init__.py
│   │   └── todo.py
│   └── tests
│       └── __init__.py
└── requirements.txt
Testing the API Endpoints
Start the app with:
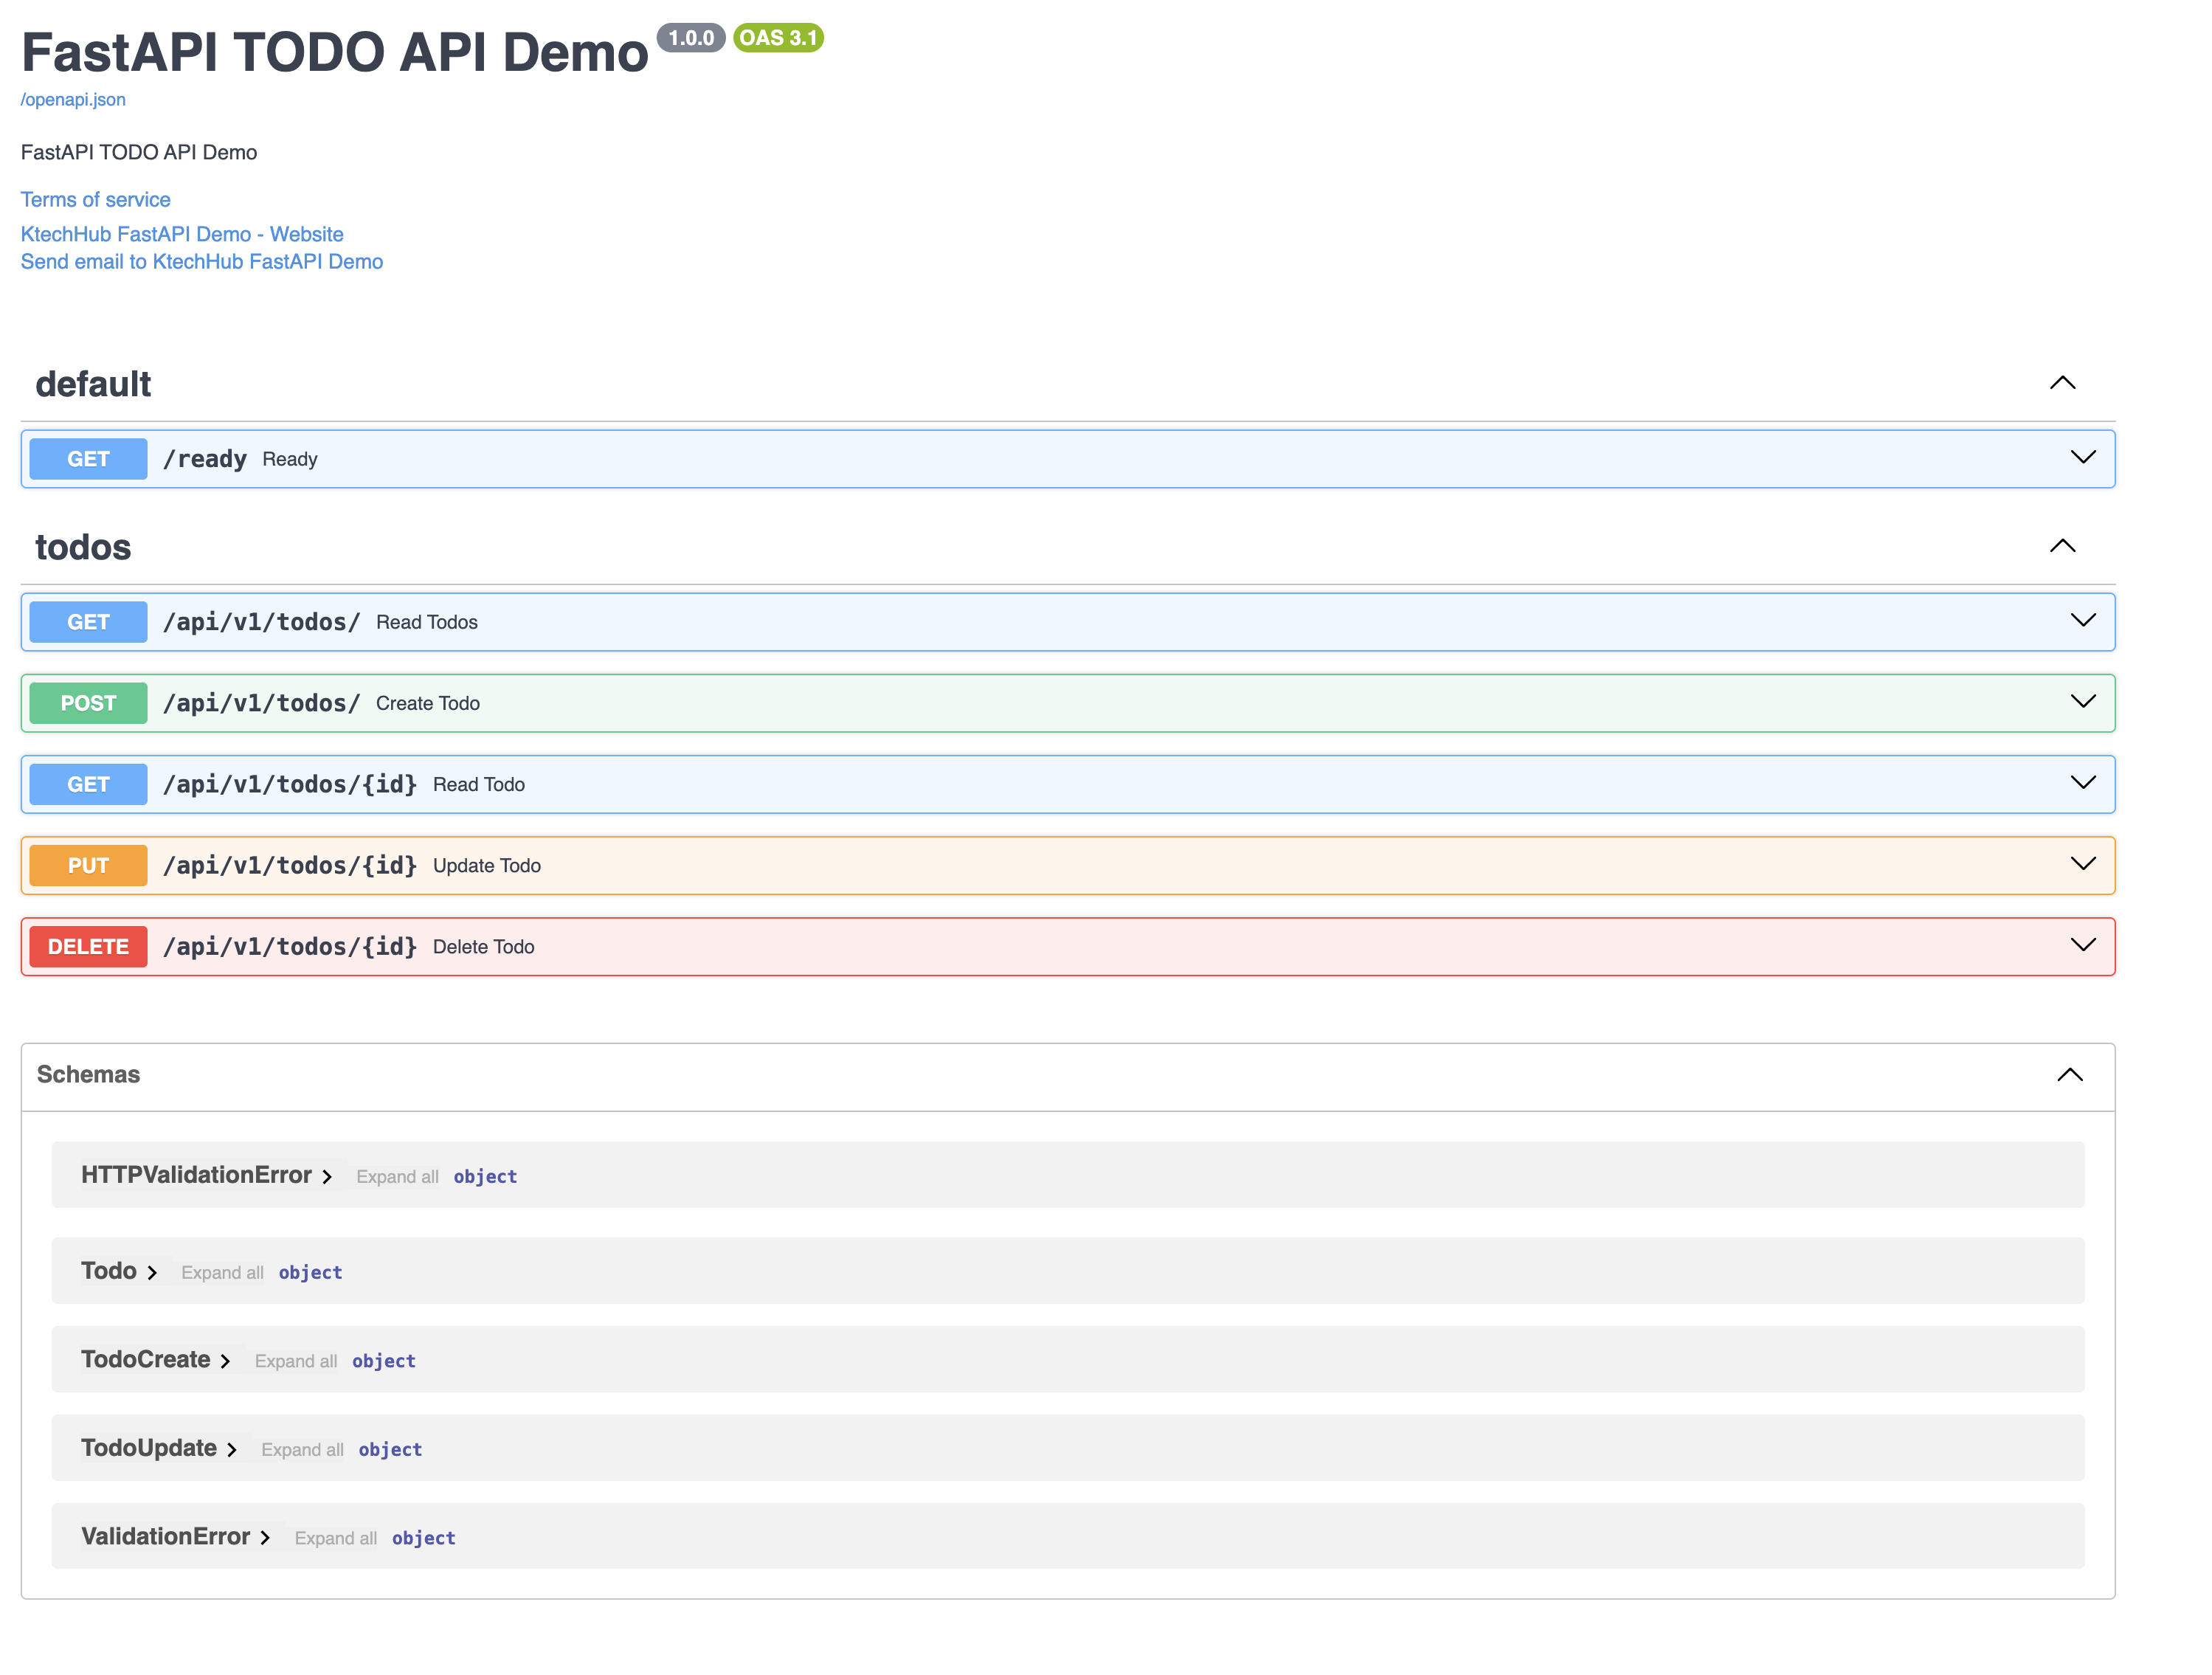
uvicorn app.main:app --reloadAnd then visit http://127.0.0.1:8000/docs to view the endpoints:
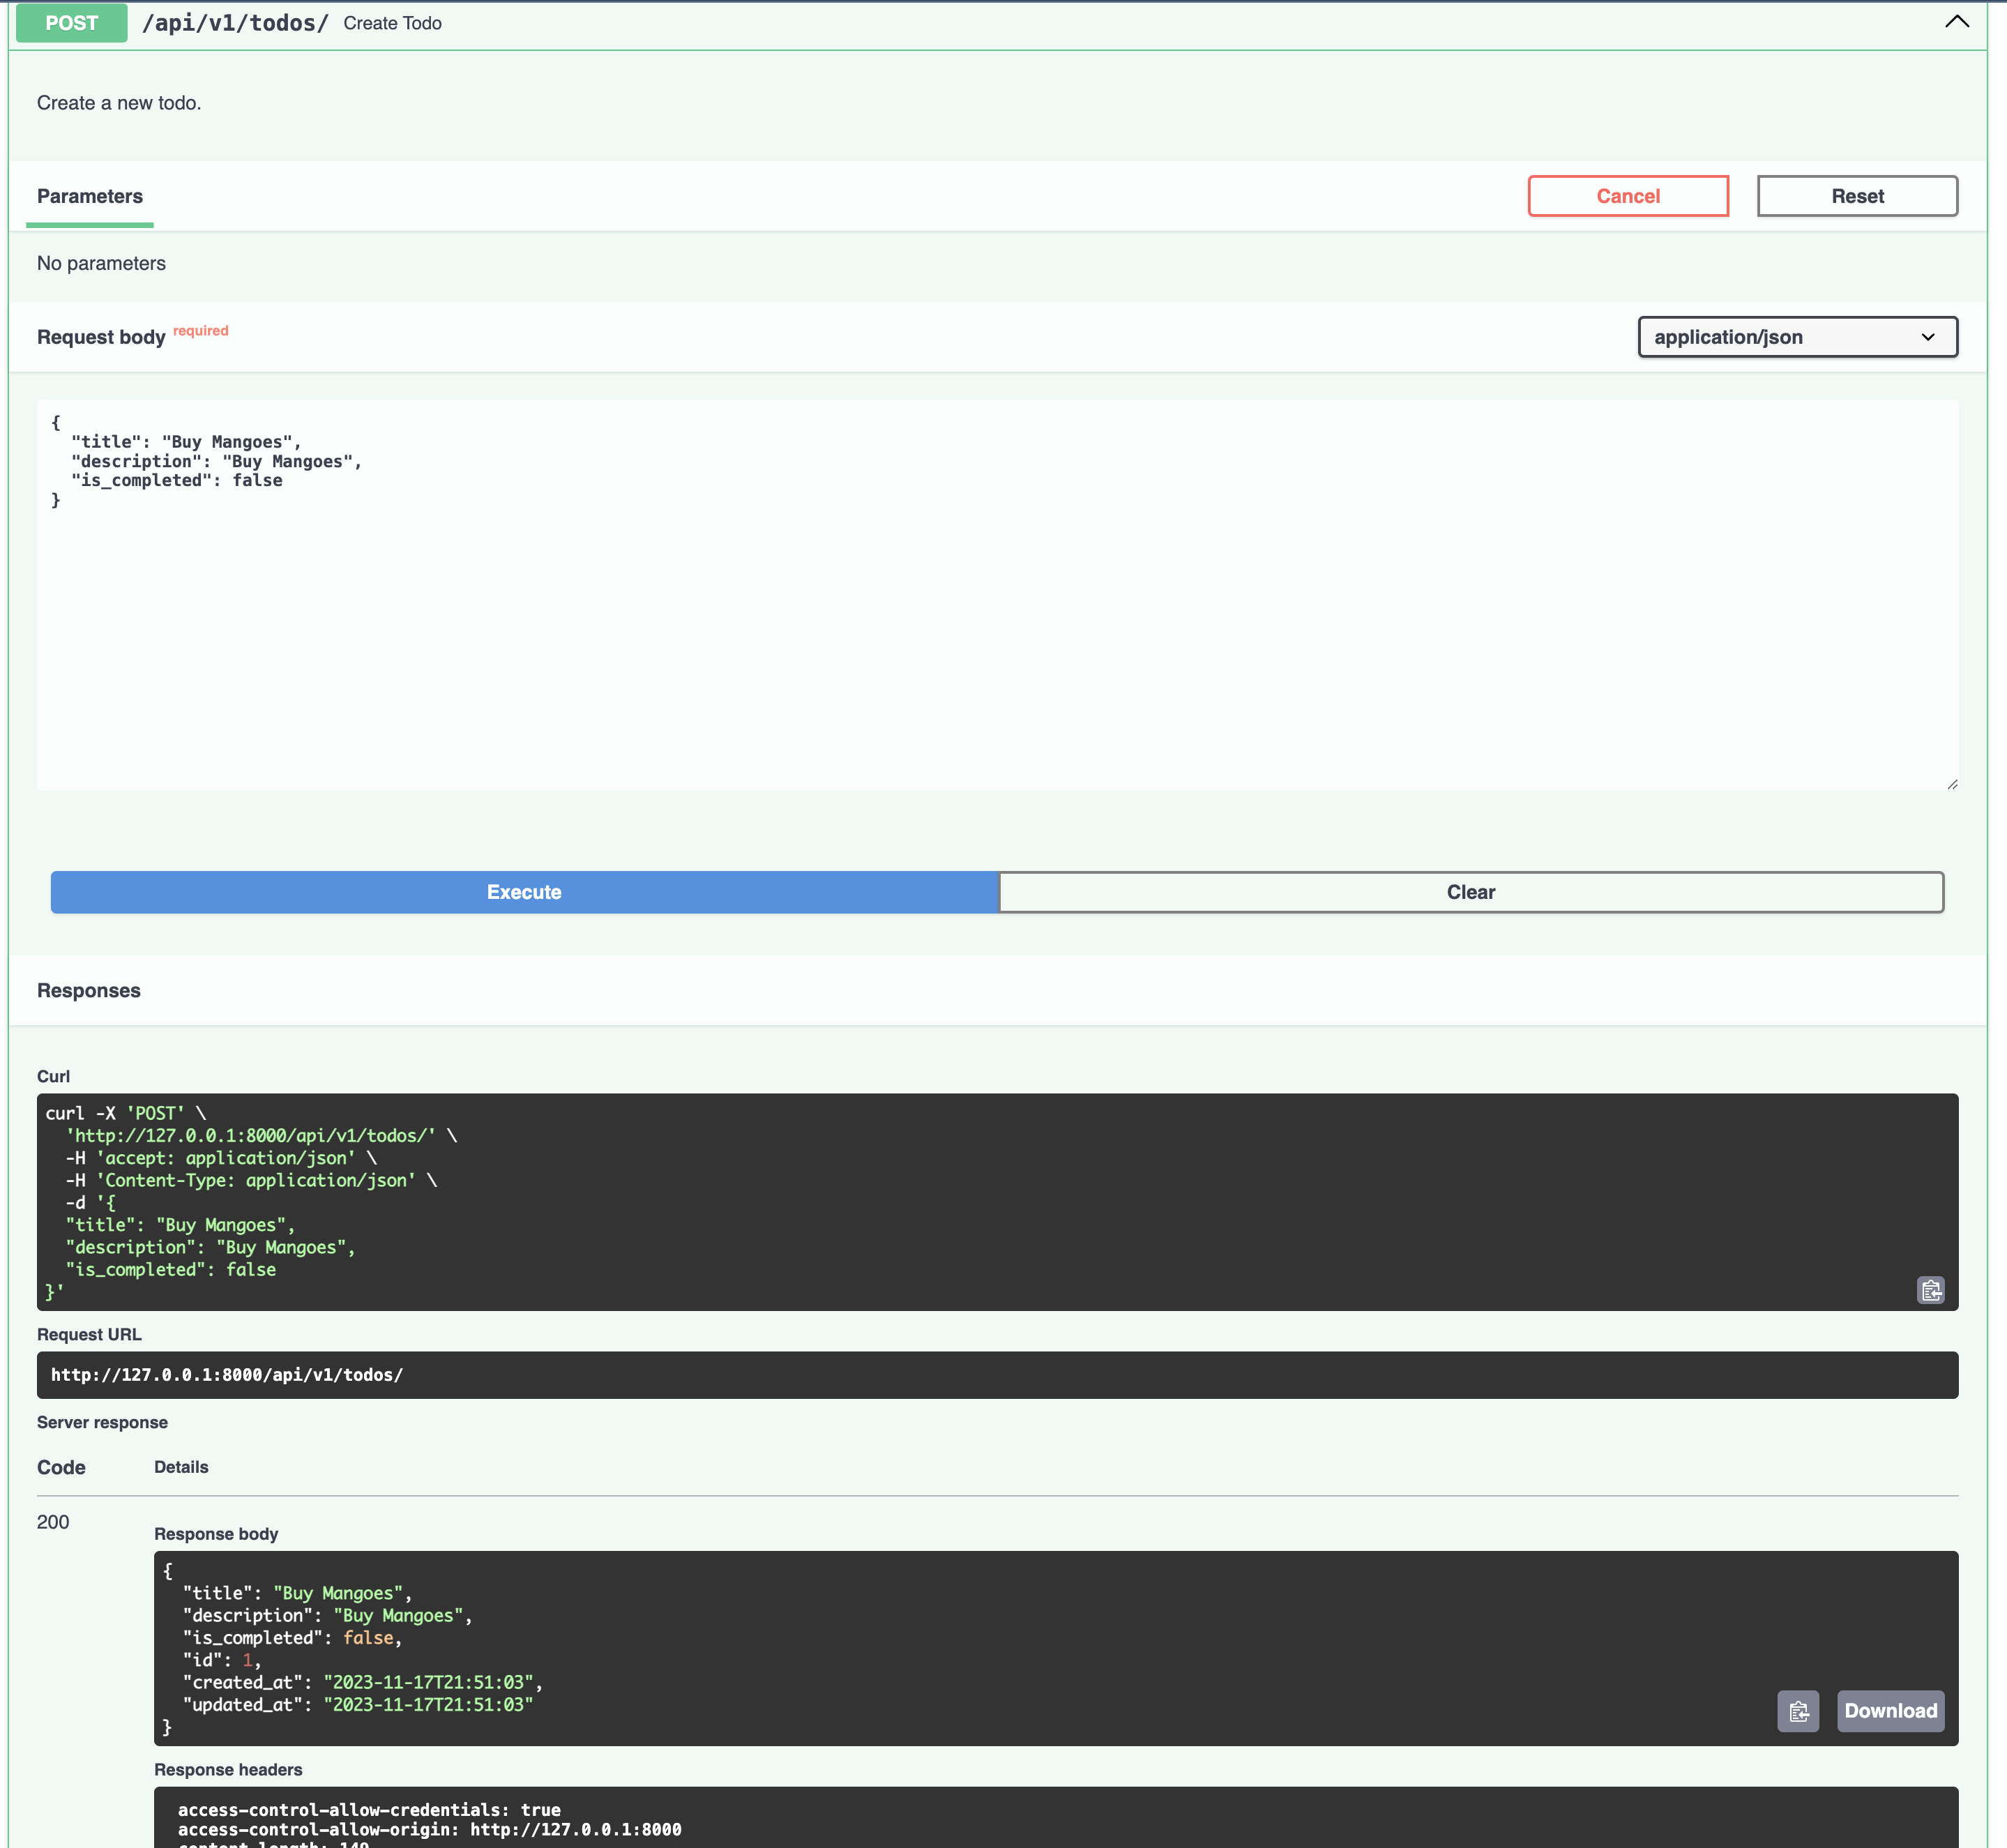
Create a todo:
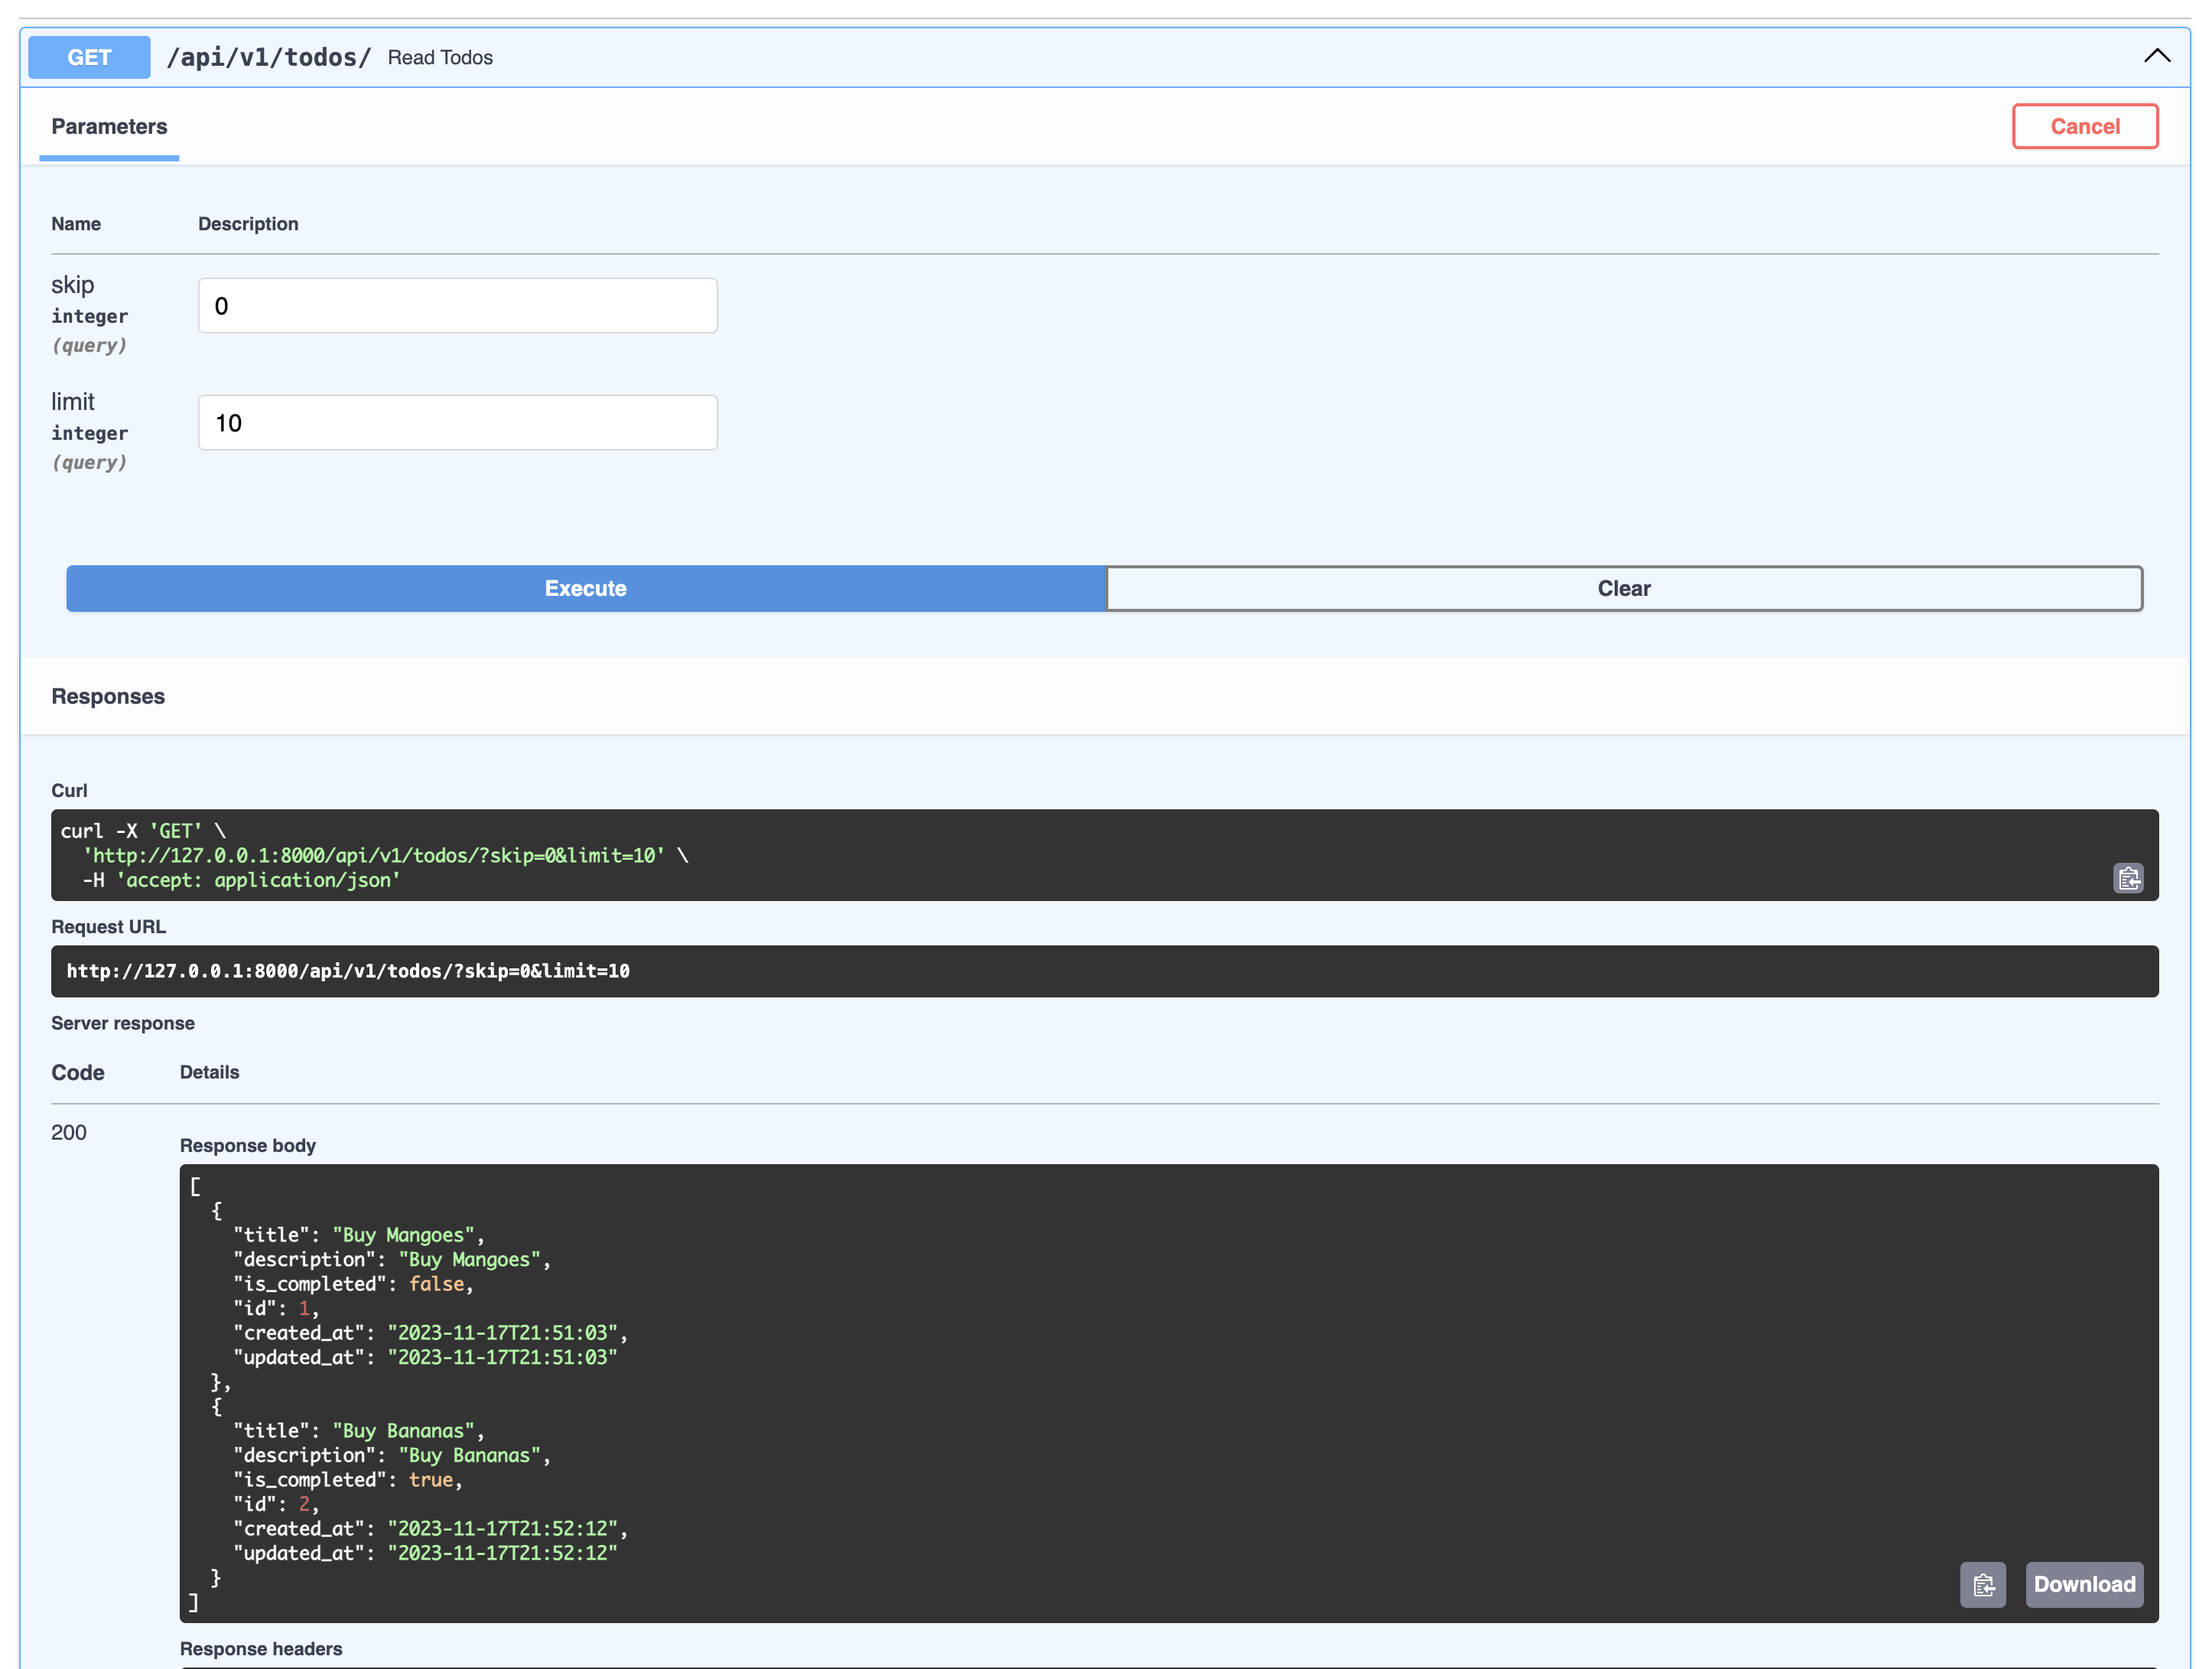
List Todos:
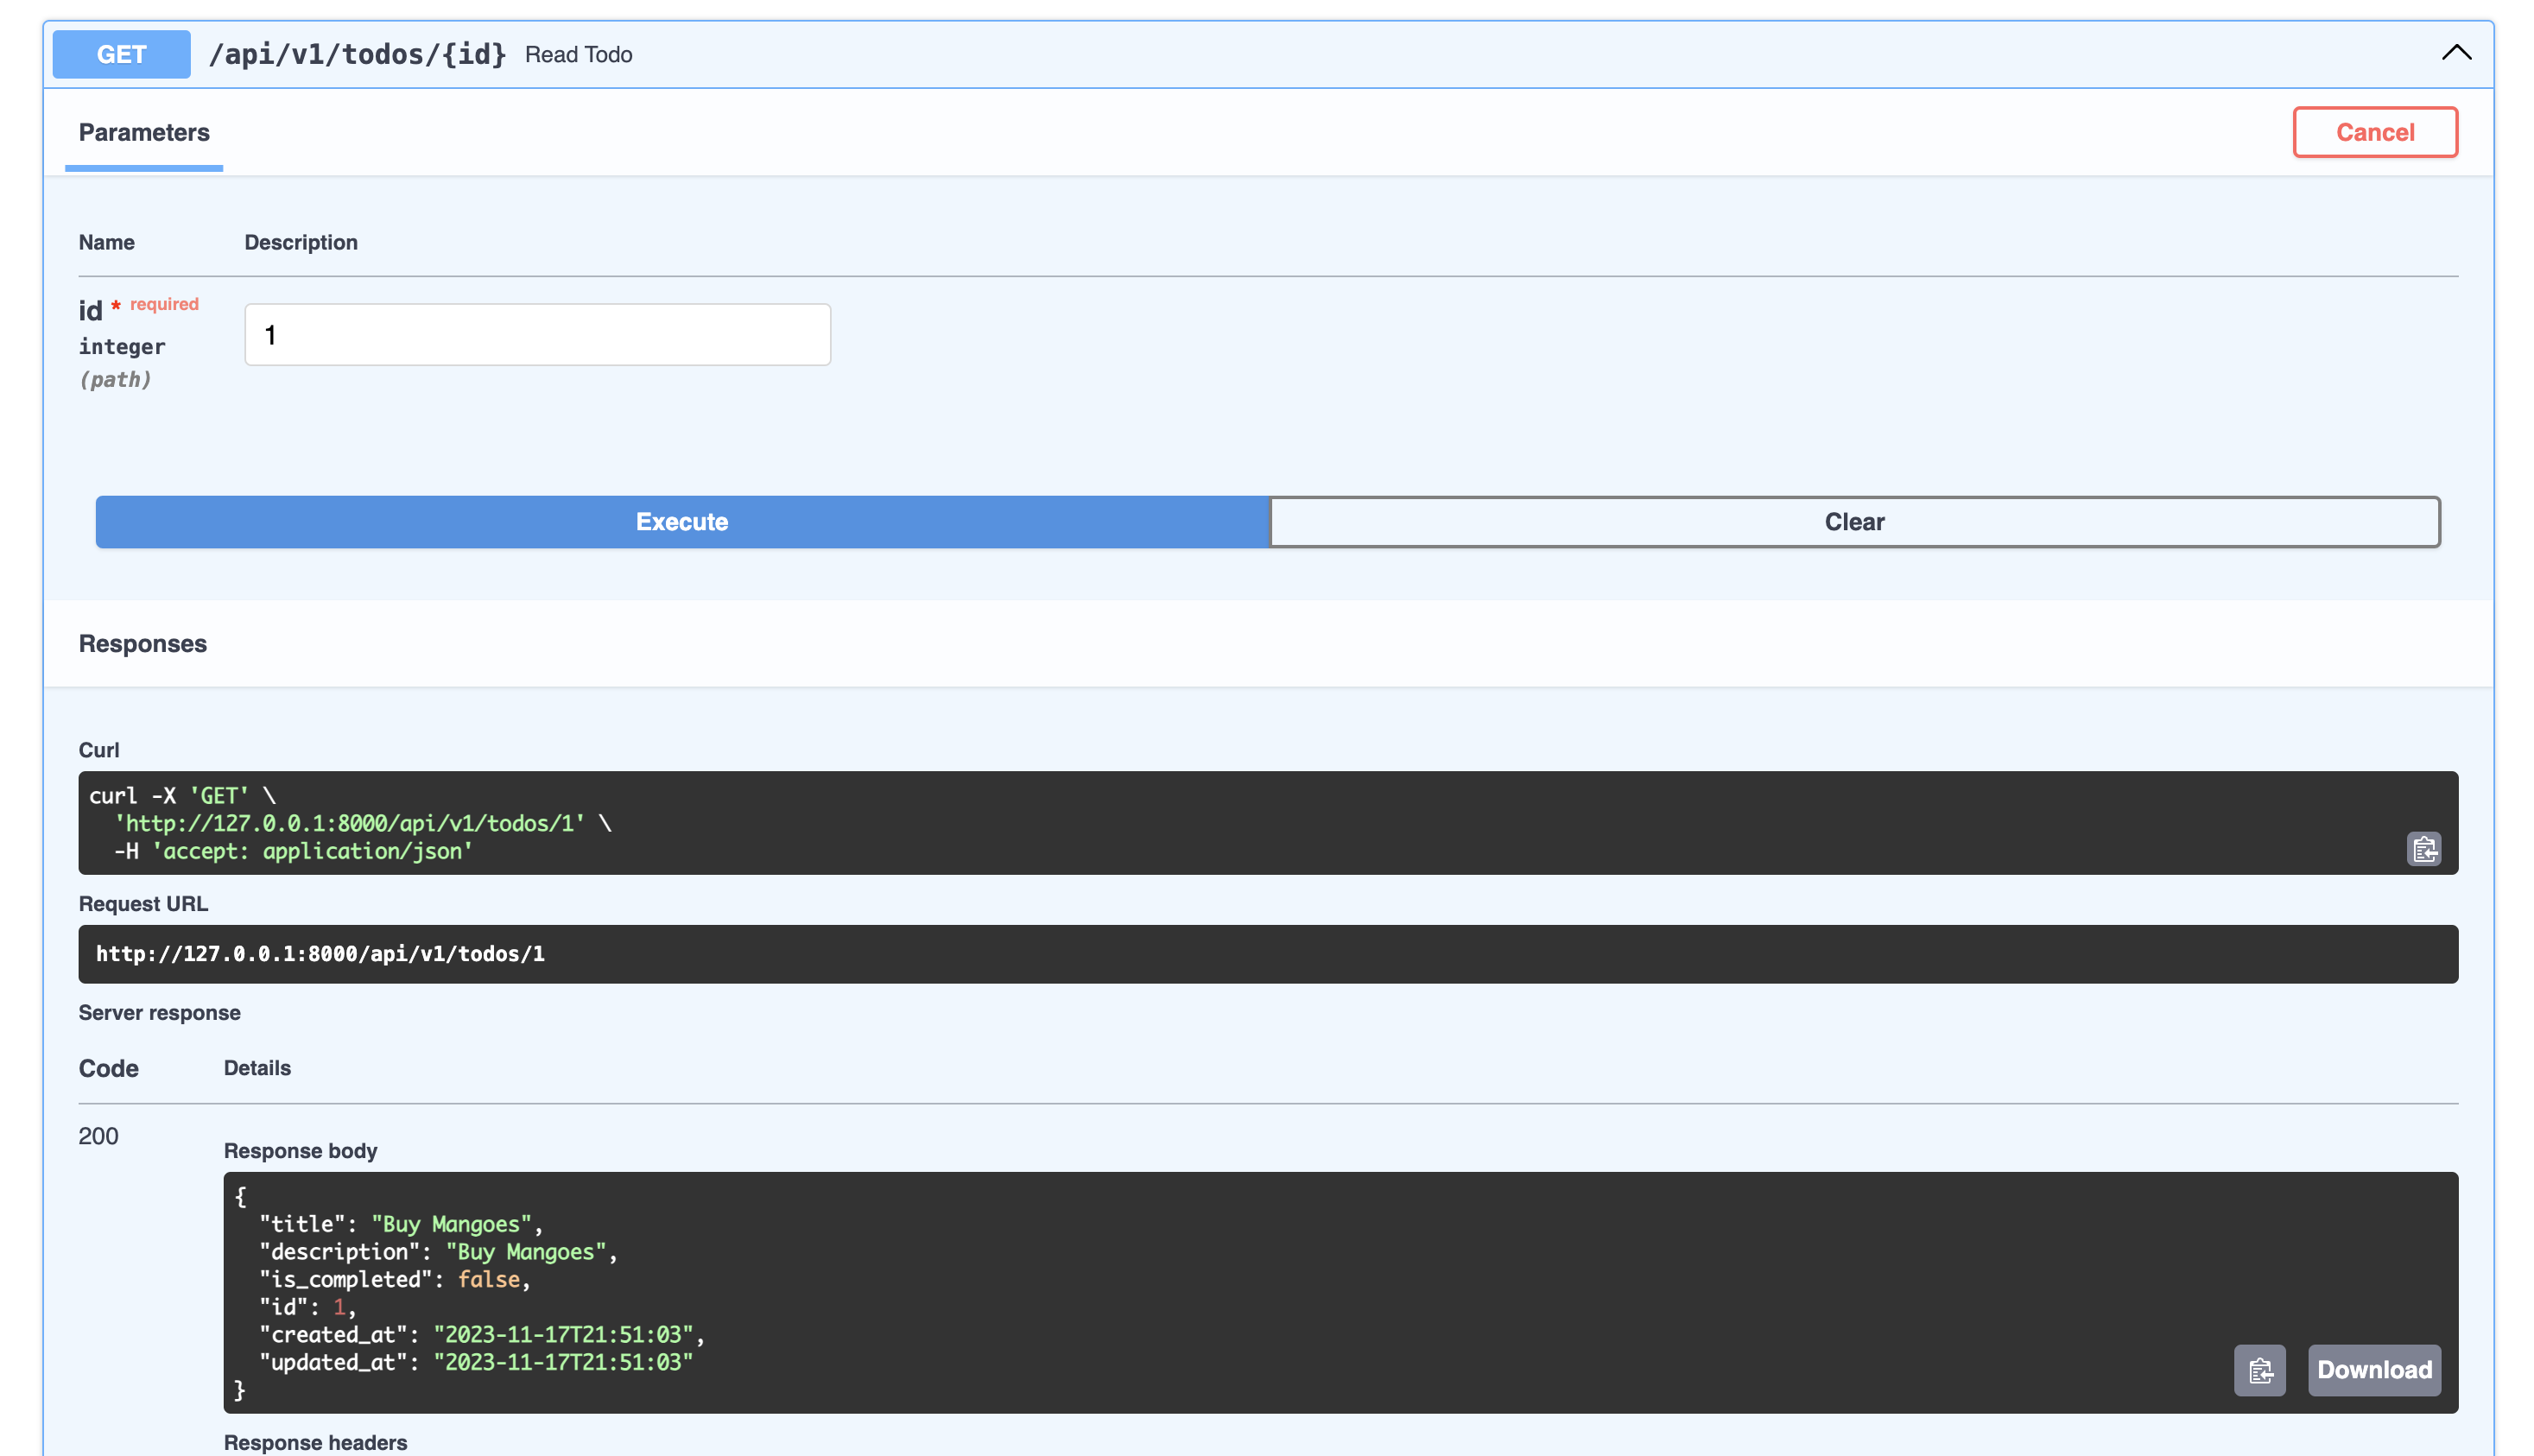
Read a single todo item:
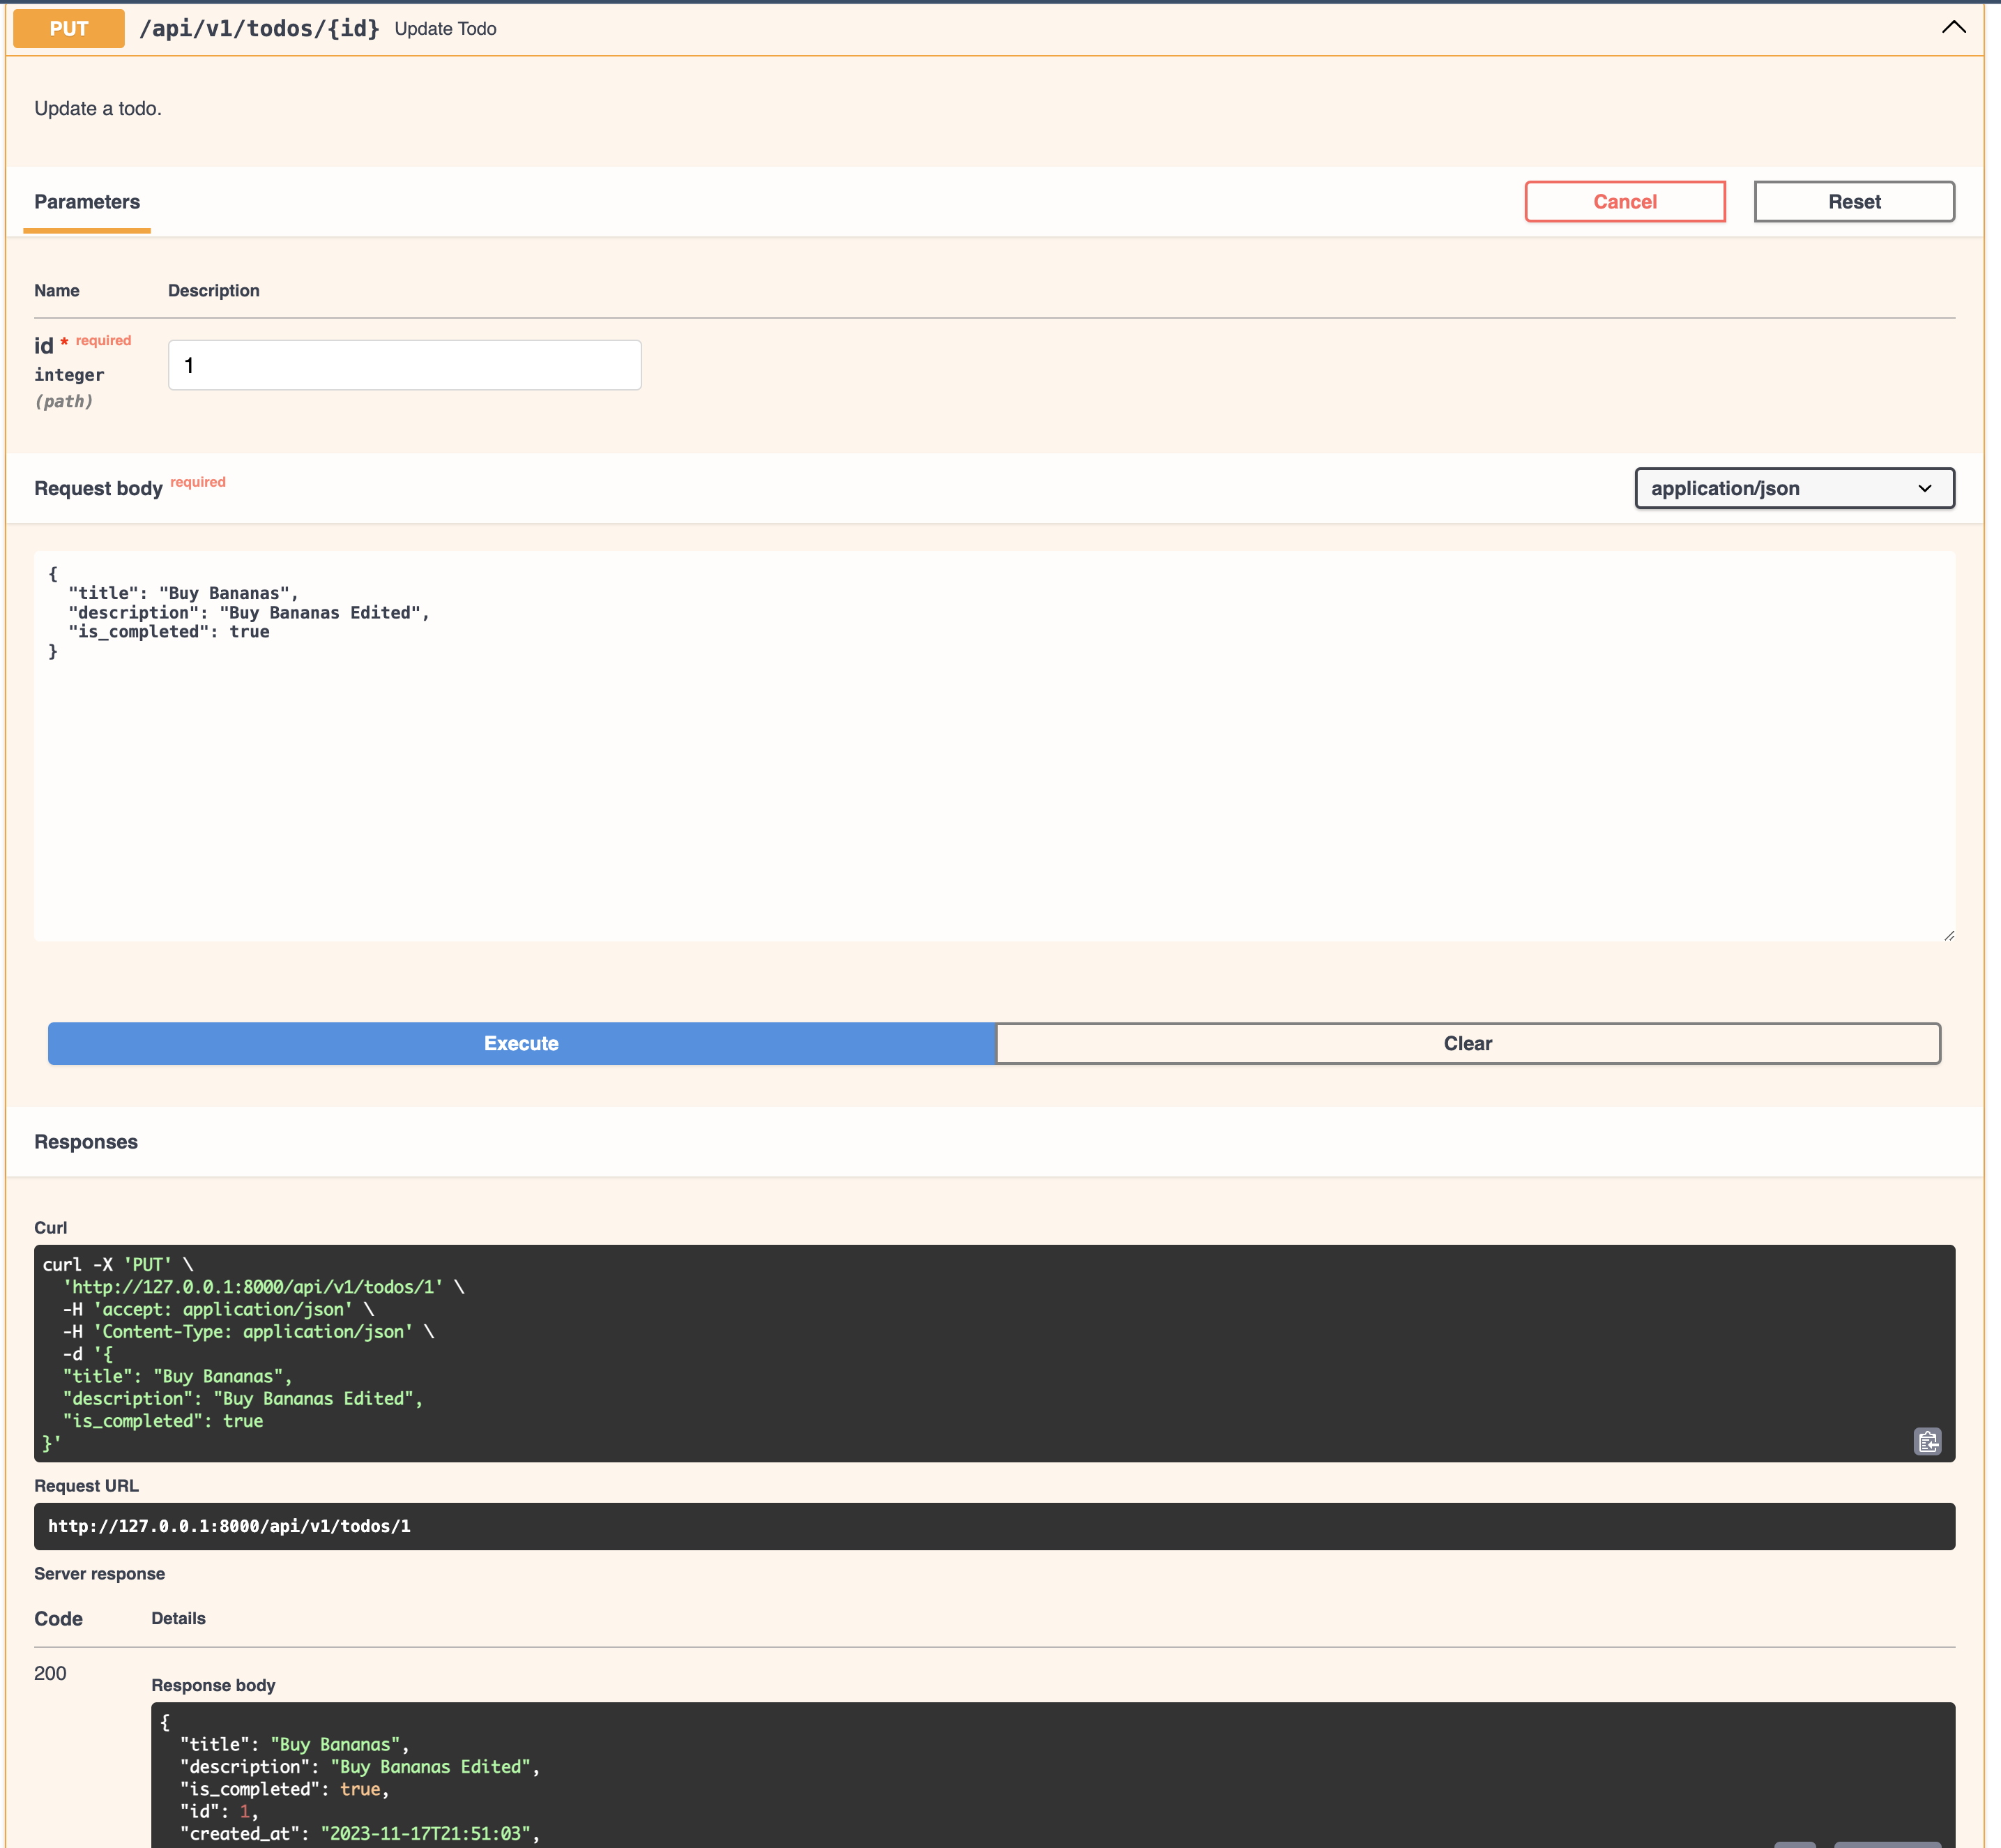
Update a todo item:
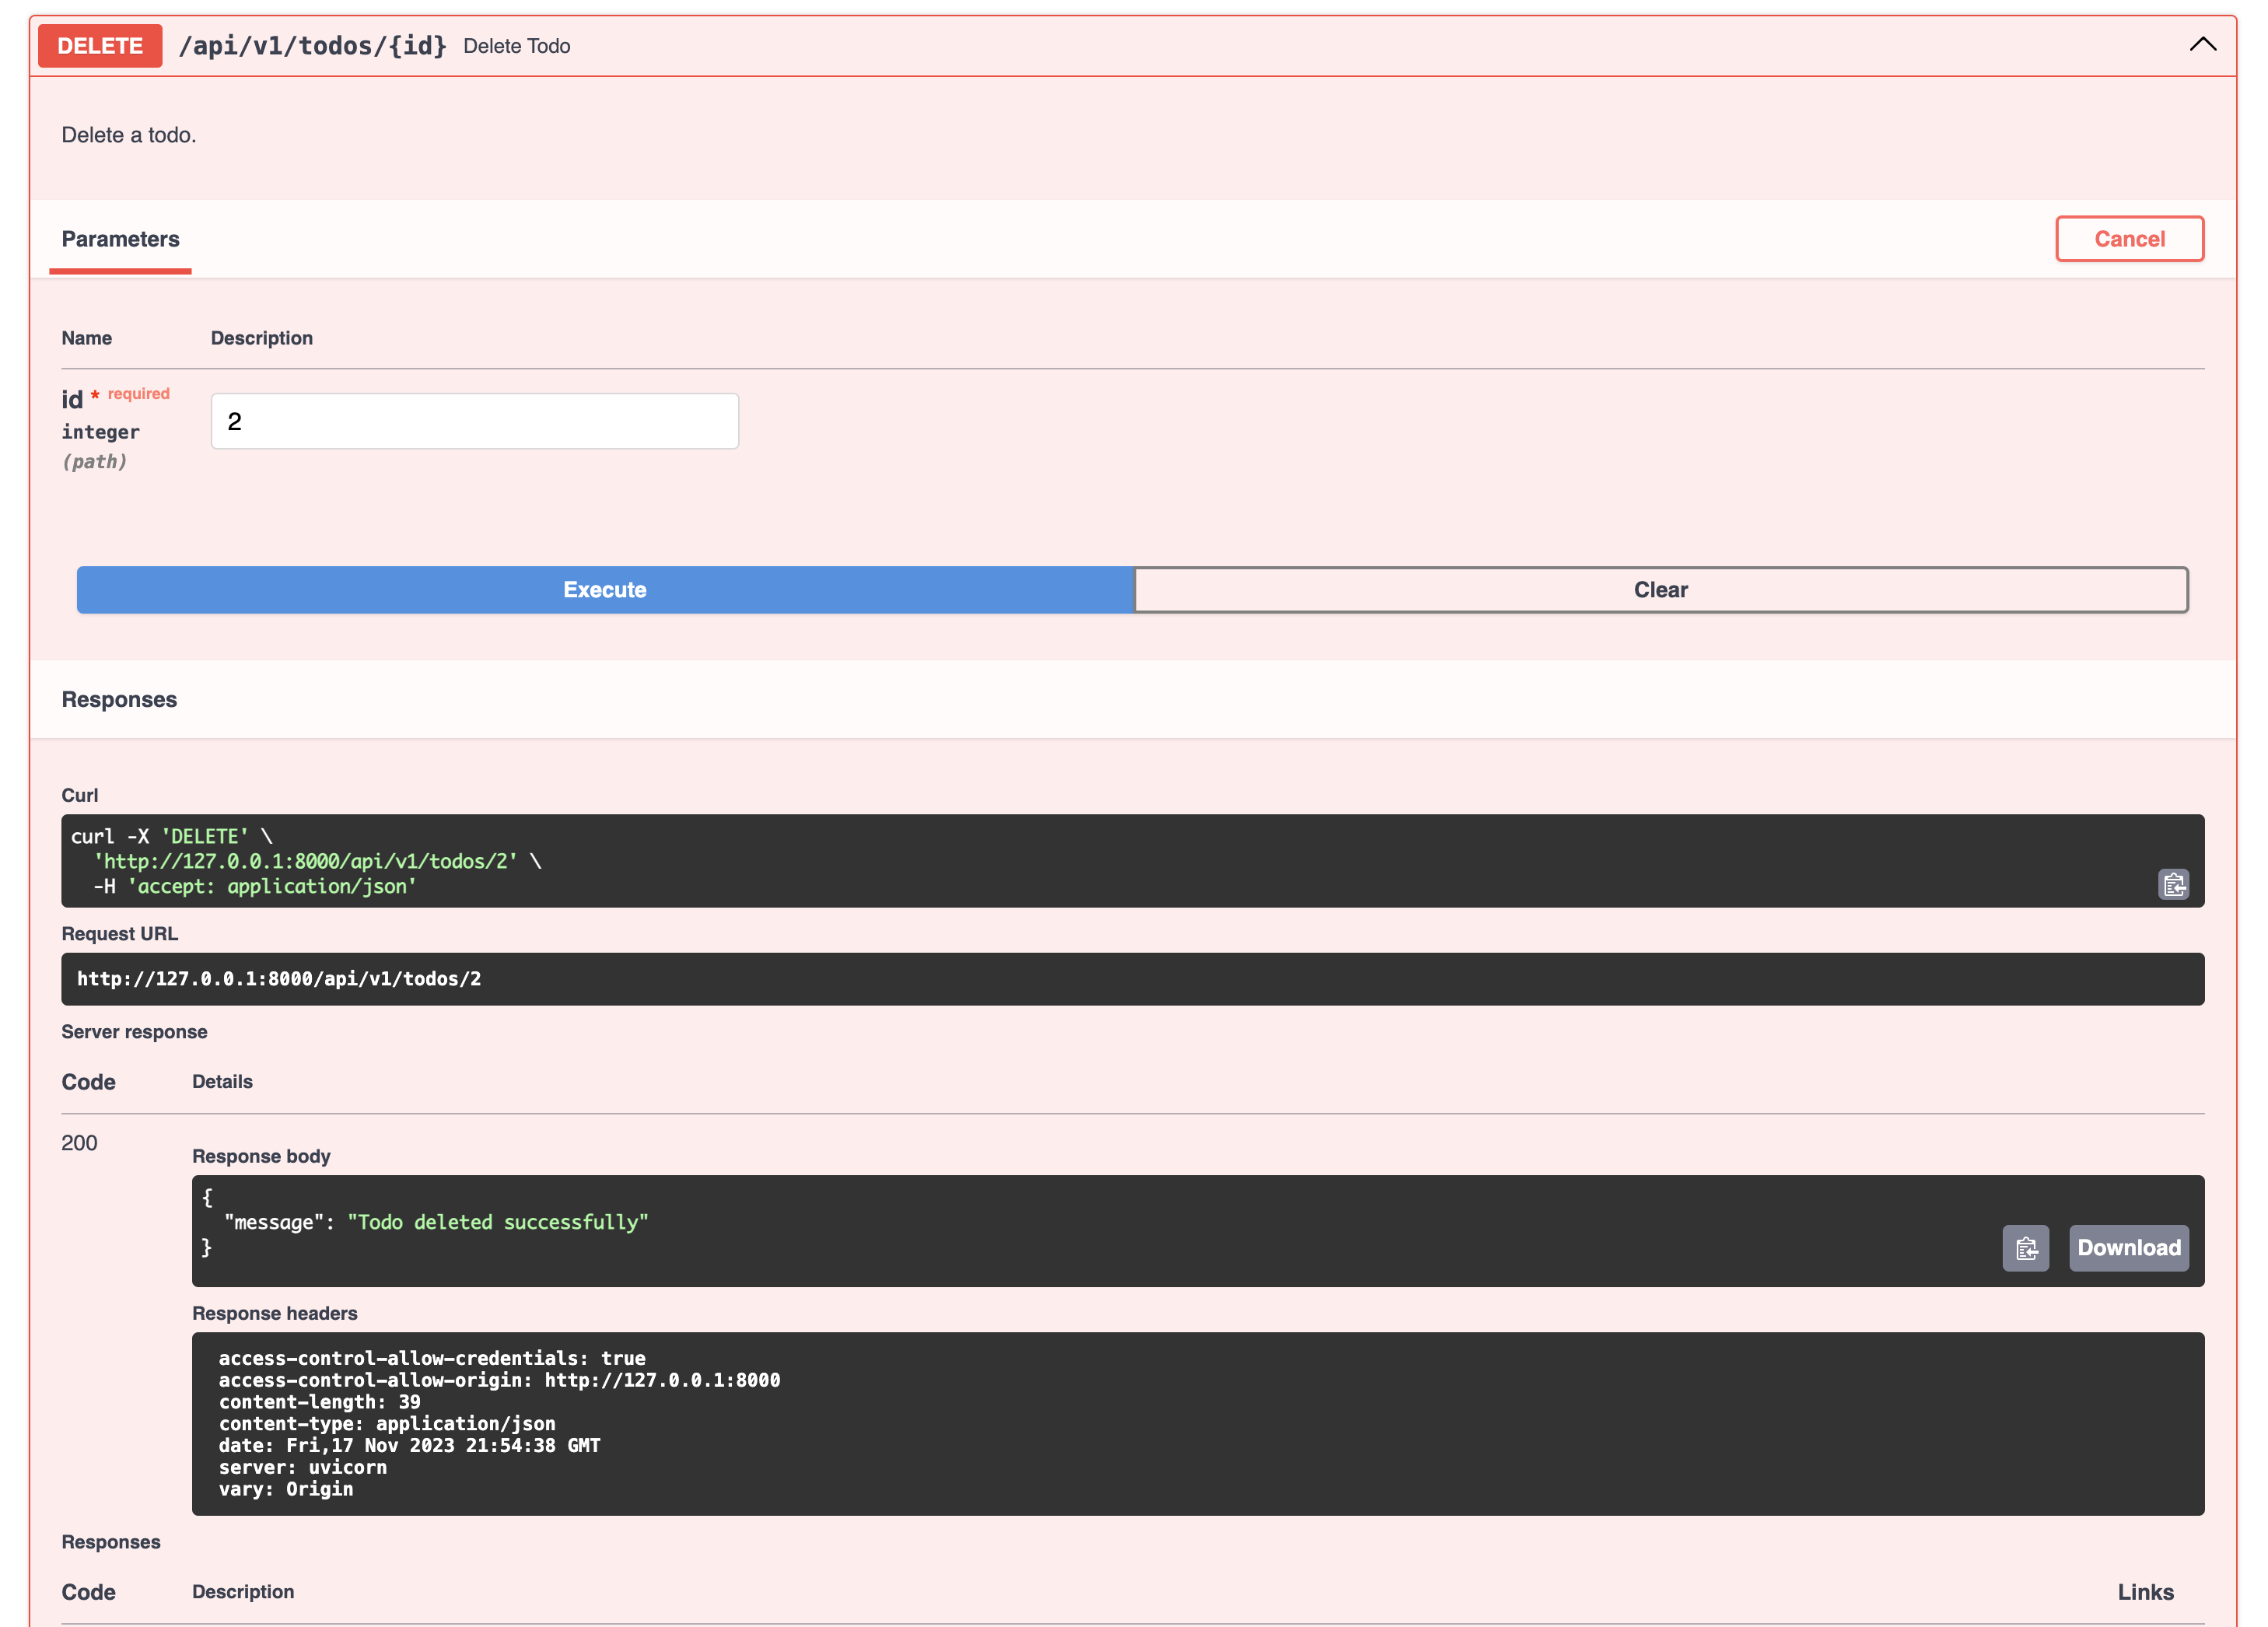
Delete a todo:
Conclusion
Congratulations! 🚀 You've successfully journeyed through the creation of a powerful and efficient TODO API using FastAPI. From setting up the project, connecting to a MySQL database, defining models and schemas, to crafting robust API endpoints for reading, creating, updating, and deleting todos, you've covered it all.
FastAPI's modern approach, automatic OpenAPI and JSON Schema documentation, and asynchronous capabilities make it a standout choice for building APIs. The use of SQLAlchemy enhances database interactions, and Pydantic ensures data validation and serialization is a breeze.
Remember, the world of FastAPI is vast, and there's much more to explore and implement. Consider enhancing your API with features like user authentication, testing, and deploying to production. Dive into FastAPI's rich documentation and community resources to uncover the full potential of this exceptional framework.
Thank you for joining us on this exciting FastAPI adventure. Now, unleash your creativity and build incredible APIs that power the future of web applications! Happy coding! 🚀✨
References
GitHub Repo for the code: https://github.com/ktechhub/fastapi_todo
Follow Us on:
X: https://twitter.com/ktechhub
LinkedIn: https://www.linkedin.com/company/ktechhub

Experienced DevOps Engineer proficient in Python, Docker, Kubernetes, CI/CD, and cloud technologies. Specialized in automating processes and building scalable infrastructure for seamless development and deployment.