Introduction
Welcome to the realm of modern web development, where creating a To-Do application becomes an adventure of innovation and exploration. In this exciting guide, we embark on a journey through the powerful landscape of Django Rest-Framework to build a feature-rich To-Do app. Are you ready to immerse yourself in the art of API creation and unleash the potential of Django's prowess? Join us as we navigate through the ins and outs of Django Rest-Framework, crafting a robust To-Do application step by step. Get ready to dive into the dynamic world of web development and unlock the secrets to bringing your To-Do app to life!
Exploring Django
Django, a Python-based web framework, serves as a free and open-source tool that aligns with the Model-View-Template (MVT) architectural pattern. This robust framework acts as a catalyst, streamlining the web development process. By embracing Django, developers can shift their focus from reinventing the wheel to honing their app creation skills.
Understanding REST APIs
A REST API, short for representational state transfer, represents a widespread method for systems to expose valuable functions and data. A REST API is typically composed of one or multiple resources, each accessible via a unique URL and deliverable in multiple formats, including JSON, images, HTML, and more.
The Power of Django REST Framework (DRF)
Django REST framework (DRF) stands as a versatile and potent toolkit specifically designed for constructing Web APIs. This framework boasts an exceptional advantage in simplifying the process of serialization, a core component in API development.
Built on Django's Foundation
Leveraging Django's class-based views, DRF stands as an exceptional choice for those well-versed in the Django framework. It incorporates elements like class-based views, forms, model validators, QuerySet, and other powerful implementations, providing a seamless bridge between familiarity and powerful API creation.
Setting Up the Development Environment
Create a Virtual Environment
Run the command from inside your projects folder to create the virtual environment.
virtualenv venv
source venv/bin/activate  # On Windows, use 'venv\Scripts\activate'
Install Django and Django Rest-Framework
pip install django djangorestframeworkCreating the Django Project and App
Start a Django Project
django-admin startproject todo_project
cd todo_project
Your project folder should look like this;
.
├── manage.py
└── todo_project
    ├── __init__.py
    ├── asgi.py
    ├── settings.py
    ├── urls.py
    └── wsgi.py
Each component within the project directory serves a specific purpose within the Django application:
manage.py
This file is a command-line utility used to interact with the Django project. It's used to perform various tasks such as starting the development server, creating new applications, running tests, and more. It serves as the entry point to execute management commands.
todo_project/
This is the directory representing the root of your Django project.
__init__.py
This file is an empty Python file that tells Python that the directory should be considered a Python package. It's a convention in Python to have this file to mark the directory as a package.
asgi.py
ASGI (Asynchronous Server Gateway Interface) is a modern standard for Python asynchronous web servers. This file is the entry point for ASGI-compatible web servers to serve your Django application.
settings.py
This file contains all the configuration settings for your Django project. It's a critical file where you define database connections, security settings, middleware, installed applications, and more. These settings are used to configure your project's behavior.
urls.py
The URL dispatcher of the project. This file contains a mapping between URLs and views (Python functions that control what content is displayed). It's where you define the paths or endpoints for your web application and associate them with views or other URLs.
wsgi.py
WSGI (Web Server Gateway Interface) is a specification for simple and universal interface between web servers and web applications or frameworks. This file serves as the entry point for WSGI-compatible web servers to serve your Django application.
This structure constitutes the foundation of a Django project, where each file or directory plays a crucial role in running, configuring, and routing the project's functionality.
Create a Django App
In Django, an "app" refers to a self-contained component within a Django project that carries out a specific function. Each app is responsible for handling a particular aspect of a web application. Apps are reusable and can be plugged into various projects, promoting modularity and clean project organization.
A Django app typically includes models, views, templates, and other necessary components to fulfill its designated purpose. It encapsulates a particular set of related functionalities. For instance, you might have separate apps for user authentication, blog posts, or e-commerce functionalities within a larger web application.
Why Use Django Apps?
Modularity: Django apps encourage modularity, making it easier to manage and scale your project. Each app can focus on a specific aspect of your project, such as user authentication, content management, or other functionalities.
Reusability: Apps are designed to be reusable across different projects. This allows you to take well-developed functionalities and incorporate them into new projects with ease.
Organization: Apps help in organizing your project's codebase by separating different functionalities into distinct modules.
Understanding and creating apps in Django is fundamental to developing large-scale and maintainable web applications while promoting a structured and modular approach to web development.
Use the following command to create a new app. Replace <app_name> with your desired app name:
python manage.py startapp <app_name>Let's create our app:
python manage.py startapp todoYou should have the structure below now;
.
├── manage.py
├── todo
│   ├── __init__.py
│   ├── admin.py
│   ├── apps.py
│   ├── migrations
│   │   └── __init__.py
│   ├── models.py
│   ├── tests.py
│   └── views.py
└── todo_project
    ├── __init__.py
    ├── asgi.py
    ├── settings.py
    ├── urls.py
    └── wsgi.py
This structure forms the foundational components of a Django app, encompassing models, views, tests, configurations, and other necessary files for developing a specific feature or functionality within the larger Django project.
__init__.py
This is an empty Python file indicating that the "todo" directory should be considered a Python package or module. It's required to treat the directory as a Python module and is used for initialization purposes.
admin.py
This file is used to define the configuration for Django's admin interface. It's where you register your models to make them accessible and modifiable through the Django admin.
apps.py
The apps.py file is used to configure the application itself. It's where you can define app-level configurations, such as the application name, default labels, and other settings specific to this app.
migrations/
The migrations directory is where Django stores its database migration files. These files record changes made to the database schema, such as creating tables or altering existing ones, using Django's migration commands.
models.py
The models.py file contains the models for the app, defining the data structure and behavior of the application's data. Models are defined as Python classes and represent database tables, specifying fields and their relationships.
tests.py
The tests.py file is used to define unit tests for the app. It allows you to write tests to ensure that your app's functionalities work as expected.
views.py
The views.py file contains the views for the app. Views are Python functions that handle HTTP requests, process data, and return HTTP responses. These views can render templates, interact with models, and form the core logic of the web application.
Register Your App
To integrate this new app into your project, you'll need to add it to the INSTALLED_APPS list in your project's settings.py file.
# todo_project/settings.py

INSTALLED_APPS = [
    'django.contrib.admin',
    'django.contrib.auth',
    'django.contrib.contenttypes',
    'django.contrib.sessions',
    'django.contrib.messages',
    'django.contrib.staticfiles',
    'rest_framework',
    'todo', # add your app here
]
Create Extra Files
Create a serializers.py and urls.py file in todo and add new files as configured in the directory structure below:
├── todo
│   ├── __init__.py
│   ├── admin.py
│   ├── apps.py
│   ├── migrations
│   │   └── __init__.py
│   ├── models.py
│   ├── serializers.py # new file
│   ├── tests.py
│   ├── urls.py # new file
│   └── views.py
serializers.py
This file, when included within a Django app, manages the transformation of complex data types (like querysets or model instances) into native Python datatypes. Serializers play a pivotal role in working with data formats like JSON, XML, or other content types for transmitting data over the network. They are particularly essential in Django Rest Framework for API development.
urls.py
The urls.py file in a Django app defines the URL patterns or routes for the app. It maps URLs to specific views or actions within the app. This mapping controls how incoming HTTP requests are handled and which view function or API endpoint should be triggered.
Update Project URLS
Be sure to include rest_framework and URLs as shown below in your main urls.py file:
"""
URL configuration for todo_project project.

The `urlpatterns` list routes URLs to views. For more information please see:
    https://docs.djangoproject.com/en/4.2/topics/http/urls/
Examples:
Function views
    1. Add an import:  from my_app import views
    2. Add a URL to urlpatterns:  path('', views.home, name='home')
Class-based views
    1. Add an import:  from other_app.views import Home
    2. Add a URL to urlpatterns:  path('', Home.as_view(), name='home')
Including another URLconf
    1. Import the include() function: from django.urls import include, path
    2. Add a URL to urlpatterns:  path('blog/', include('blog.urls'))
"""
from django.contrib import admin
from django.urls import path, include

urlpatterns = [
    path('admin/', admin.site.urls),
    path('api-auth/', include('rest_framework.urls')),
    path('todos/', include('todo.urls')),
]
Update the todo urls with below; We will revisit it later.
# todo/urls.py
from django.urls import path, include

urlpatterns = []
Initial Migrations
Run the initial migrations with;
python manage.py migrateThis will populate the db with all necessary tables;
Operations to perform:
  Apply all migrations: admin, auth, contenttypes, sessions
Running migrations:
  Applying contenttypes.0001_initial... OK
  Applying auth.0001_initial... OK
  Applying admin.0001_initial... OK
  Applying admin.0002_logentry_remove_auto_add... OK
  Applying admin.0003_logentry_add_action_flag_choices... OK
  Applying contenttypes.0002_remove_content_type_name... OK
  Applying auth.0002_alter_permission_name_max_length... OK
  Applying auth.0003_alter_user_email_max_length... OK
  Applying auth.0004_alter_user_username_opts... OK
  Applying auth.0005_alter_user_last_login_null... OK
  Applying auth.0006_require_contenttypes_0002... OK
  Applying auth.0007_alter_validators_add_error_messages... OK
  Applying auth.0008_alter_user_username_max_length... OK
  Applying auth.0009_alter_user_last_name_max_length... OK
  Applying auth.0010_alter_group_name_max_length... OK
  Applying auth.0011_update_proxy_permissions... OK
  Applying auth.0012_alter_user_first_name_max_length... OK
  Applying sessions.0001_initial... OK
You should now have a directory structure below;
.
├── db.sqlite3 # new file
├── manage.py
├── todo
│   ├── __init__.py
│   ├── admin.py
│   ├── apps.py
│   ├── migrations
│   │   ├── __init__.py
│   ├── models.py
│   ├── serializers.py
│   ├── tests.py
│   ├── urls.py
│   └── views.py
└── todo_project
    ├── __init__.py
    ├── asgi.py
    ├── settings.py
    ├── urls.py
    └── wsgi.py
Create a superuser
To create a superuser in Django, you can use the createsuperuser command through the Django's management interface, manage.py. This command allows you to create a user with superuser privileges, granting access to the Django admin interface.
Here are the steps to create a superuser using the command line:
Run the following command:
python manage.py createsuperuserYou'll be prompted to provide details for the new superuser:
- Enter a username for the superuser.
- Provide an email address for the user (optional).
- Enter and confirm a password for the superuser.
Upon successful creation, you'll receive a message similar to:
Superuser created successfully.To access the Django admin panel:
- Start the Django development server
-
Open your web browser and go to the admin interface URL, usually http://127.0.0.1:8000/admin/.
python manage.py runserver - Log in using the superuser credentials you just created.
This superuser account will have access to the Django admin panel, allowing you to manage the application's data and configurations.
Creating Models for todo app
# todo/models.py
from django.db import models
from django.contrib.auth.models import User


class Todo(models.Model):
    title = models.CharField(max_length=180)
    description = models.TextField(blank=True, null=True)
    user = models.ForeignKey(User, on_delete=models.CASCADE)
    is_completed = models.BooleanField(default=False)
    created_at = models.DateTimeField(auto_now_add=True, blank=True)
    updated_at = models.DateTimeField(auto_now=True)

    def __str__(self):
        return self.name
This code snippet defines a Django model called `Todo` in `todo/models.py`, representing a Todo item in the application. Let's discuss its structure and functionality:
Import Statements:
- from django.db import models: Imports the Django model functionality.
- from django.contrib.auth.models import User: Imports the default User model provided by Django for handling user authentication and authorization.
Todo Model:
- class Todo(models.Model): Defines the `Todo` model, which inherits from `models.Model`.
Attributes of `Todo` Model:
- title: A field representing the title of the Todo item, defined as a character field with a maximum length of 180 characters.
- description: A text field allowing a longer description for the Todo item, which can be left blank (nullable).
- user: A foreign key relationship field referencing the Django `User` model. It establishes a many-to-one relationship, associating each Todo item with a single user. The `on_delete=models.CASCADE` argument ensures that if the associated user is deleted, all linked Todo items will also be deleted.
- is_completed: A boolean field indicating whether the Todo is completed or not. It defaults to `False`.
- created_at: A DateTime field that automatically records the date and time when the Todo item is created.
- updated_at: A DateTime field that automatically updates whenever the Todo item is modified.
__str__ Method:
- def __str__(self): A method that returns a string representation of the object. In this case, it returns the `title` attribute, ensuring that when accessing the Todo object as a string (e.g., in the admin panel), the title will be displayed.
This model captures the structure of a Todo item, including its title, description, completion status, creation and modification timestamps, and association with a specific user using a foreign key relationship.
After creating the model, migrate to the database with;
python manage.py makemigrations
python manage.py migrate
Output:
Migrations for 'todo':
  todo/migrations/0001_initial.py
    - Create model Todo
Operations to perform:
  Apply all migrations: admin, auth, contenttypes, sessions, todo
Running migrations:
  Applying todo.0001_initial... OK
Model Serializer
The ModelSerializer class within the Django REST framework serves the purpose of transforming a Model object into a JSON format suitable for APIs. It seamlessly converts any model into serialized JSON objects, making it effortlessly accessible and consumable through API endpoints.
# todo/serializers.py
from rest_framework import serializers
from .models import Todo


class TodoSerializer(serializers.ModelSerializer):
    class Meta:
        model = Todo
        fields = [
            "id",
            "title",
            "description",
            "is_completed",
            "user",
            "created_at",
            "updated_at",
        ]
        read_only_fields = ["id", "user", "created_at", "updated_at"]
The given code in todo/serializers.py defines a TodoSerializer class that utilizes the ModelSerializer provided by the Django REST Framework to serialize the Todo model into a specific JSON format for use in APIs. Here's a breakdown of its components:
Import Statements:
- from rest_framework import serializers: Imports the necessary module from Django REST Framework for serializer functionalities.
- from .models import Todo: Imports the `Todo` model from the local `models.py` file.
TodoSerializer Class:
- class TodoSerializer(serializers.ModelSerializer): Defines a serializer class `TodoSerializer` that inherits from `serializers.ModelSerializer`.
Meta Class and Attributes:
- Meta is an inner class that contains metadata about the serialization process.
- model = Todo: Specifies the model associated with the serializer, in this case, the `Todo` model.
- fields: Defines the fields from the `Todo` model to be included in the serialized output. These fields will be present when the model data is converted into JSON. They include "title", "description", "user", "is_completed", "created_at", and "updated_at".
- read_only_fields: Specifies fields that should not be modifiable when deserializing data, typically used for fields like "user", "created_at", and "updated_at". The data will be read-only, and changes won't be accepted from the incoming requests for these fields.
Creating API Views
Creating API views in Django involves setting up endpoints to handle various HTTP methods. Below is an explanation with modifications and additions to implement two API views: a list view and a detail view.
# todo/views.py
from rest_framework.views import APIView
from rest_framework.response import Response
from rest_framework import status
from rest_framework import permissions
from .models import Todo
from .serializers import TodoSerializer


class TodoAPIView(APIView):
    permission_classes = [permissions.IsAuthenticated]

    # 1. List all (GET)
    def get(self, request, *args, **kwargs):
        """
        List all the todo items for a given requested user
        """
        todos = Todo.objects.filter(user=request.user)
        serializer = TodoSerializer(todos, many=True)
        return Response(serializer.data, status=status.HTTP_200_OK)

    # 2. Create (POST)
    def post(self, request, *args, **kwargs):
        """
        Create a Todo with given todo data
        """
        serializer = TodoSerializer(data=request.data)
        if serializer.is_valid():
            serializer.save(user=request.user)
            return Response(serializer.data, status=status.HTTP_201_CREATED)
        return Response(serializer.errors, status=status.HTTP_400_BAD_REQUEST)

    # 3. Update (PUT)
    def put(self, request, pk, *args, **kwargs):
        """
        Update a specific Todo
        """
        try:
            todo = Todo.objects.get(pk=pk)
            self.check_object_permissions(request, todo)
        except Todo.DoesNotExist:
            return Response(
                {"message": "Todo does not exist."}, status=status.HTTP_404_NOT_FOUND
            )

        serializer = TodoSerializer(todo, data=request.data)
        if serializer.is_valid():
            serializer.save()
            return Response(serializer.data, status=status.HTTP_200_OK)
        return Response(serializer.errors, status=status.HTTP_400_BAD_REQUEST)

    # 4. Delete (DELETE)
    def delete(self, request, pk, *args, **kwargs):
        """
        Delete a specific Todo
        """
        try:
            todo = Todo.objects.get(pk=pk)
            self.check_object_permissions(request, todo)
            todo.delete()
            return Response(
                {"message": "Todo deleted successfully."},
                status=status.HTTP_204_NO_CONTENT,
            )
        except Todo.DoesNotExist:
            return Response(
                {"message": "Todo does not exist."}, status=status.HTTP_404_NOT_FOUND
            )
This view handles:
List all (GET): Retrieves all todos associated with the requested user and returns the serialized data.
Create (POST): Creates a new Todo item based on the received data for title, description, is_completed, and associates it with the requesting user.
Put (PUT): Updates a Todo item based on the received data for title, description, is_completed and item ID.
Delete (DELETE): Deletes a Todo item based on the received data ID.
Each function within the API view corresponds to a specific HTTP method (GET and POST) and executes the necessary logic for the respective action.
Now let's update the urls as follow;
# todo/urls.py
from django.urls import path
from .views import TodoAPIView

urlpatterns = [
    path("api/", TodoAPIView.as_view(), name="todo-list"),
    path("api/<int:pk>/", TodoAPIView.as_view(), name="todo-detail"),
]
This configuration sets up the URL patterns for your API endpoints:
- The URL pattern api/ maps to the TodoListApiView. This view handles the list of To-dos with `GET` and `POST` methods.
- The URL pattern api/<int:pk>/ connects to the TodoDetailApiView. This view is responsible for individual To-do items identified by their primary key (pk). It handles GET, PUT, and DELETE methods.
These URL patterns direct HTTP requests to their corresponding views, enabling the application to handle these methods for your To-do list API. Adjust these URL configurations as needed based on your project requirements.
Now visit http://127.0.0.1:8000/todos/api/ to view the endpoint.
Create a todo item:
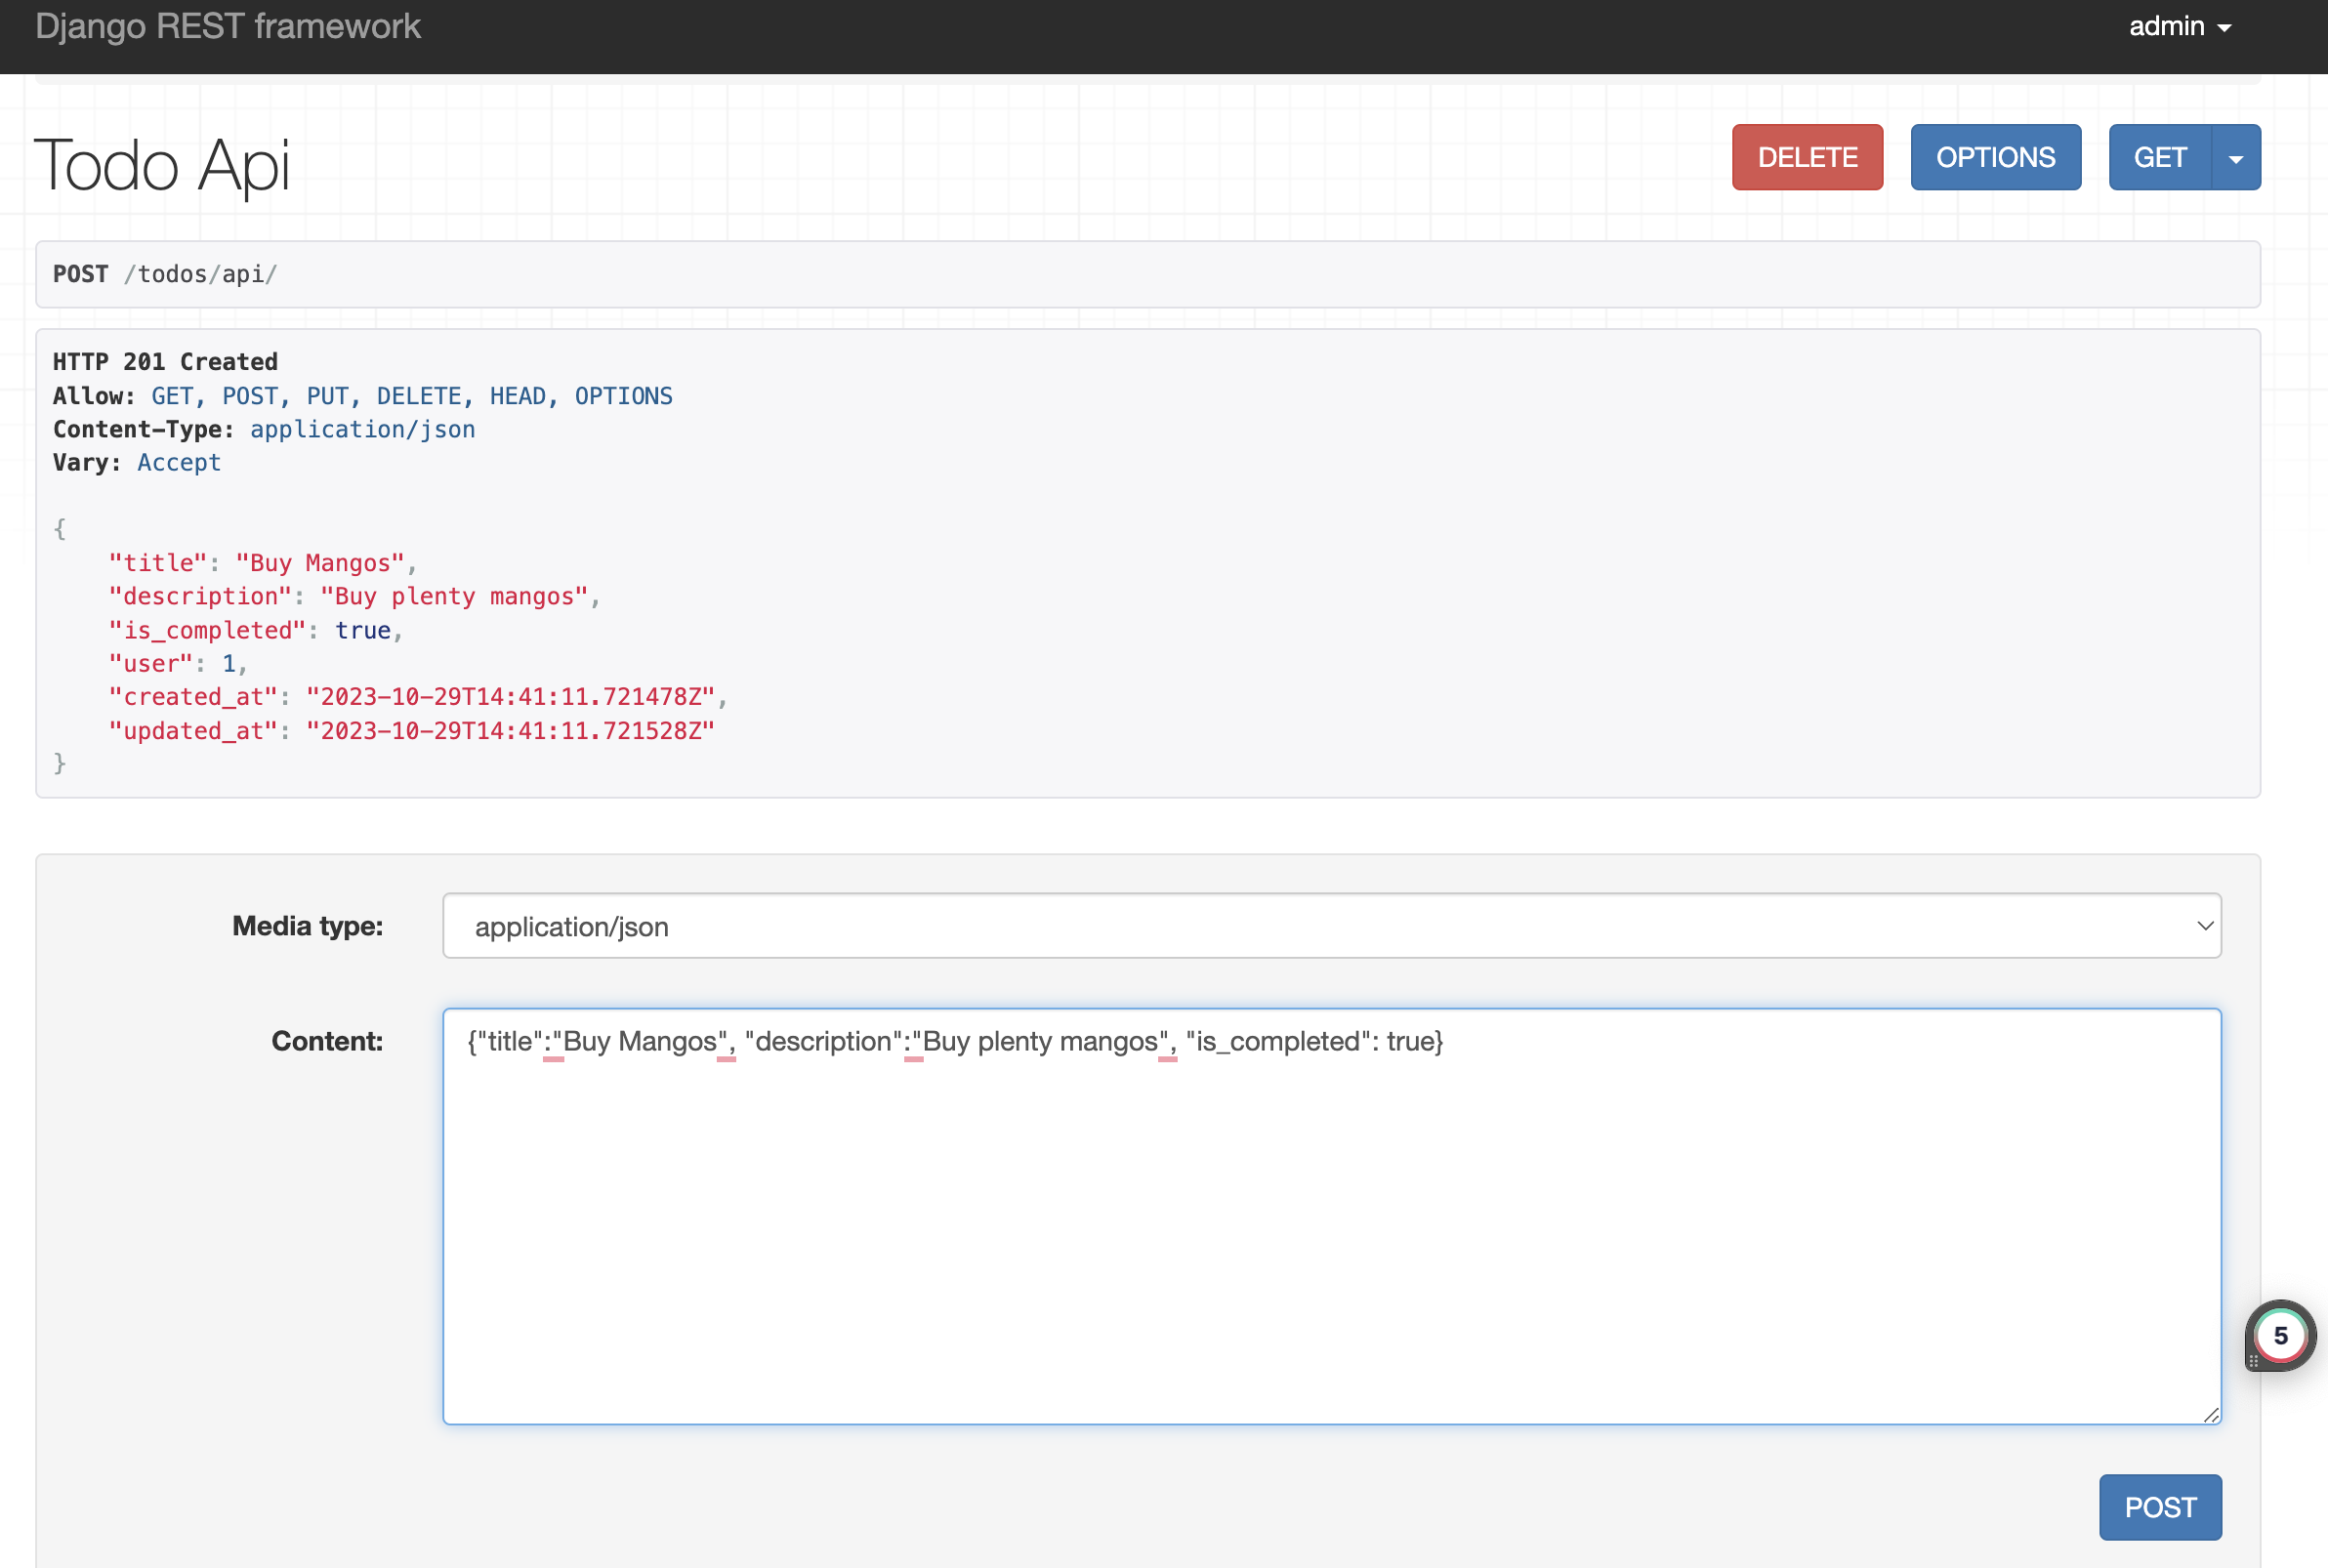
Once it's posted, it will be added like the above.
I have added another one, go ahead and add more as you want.
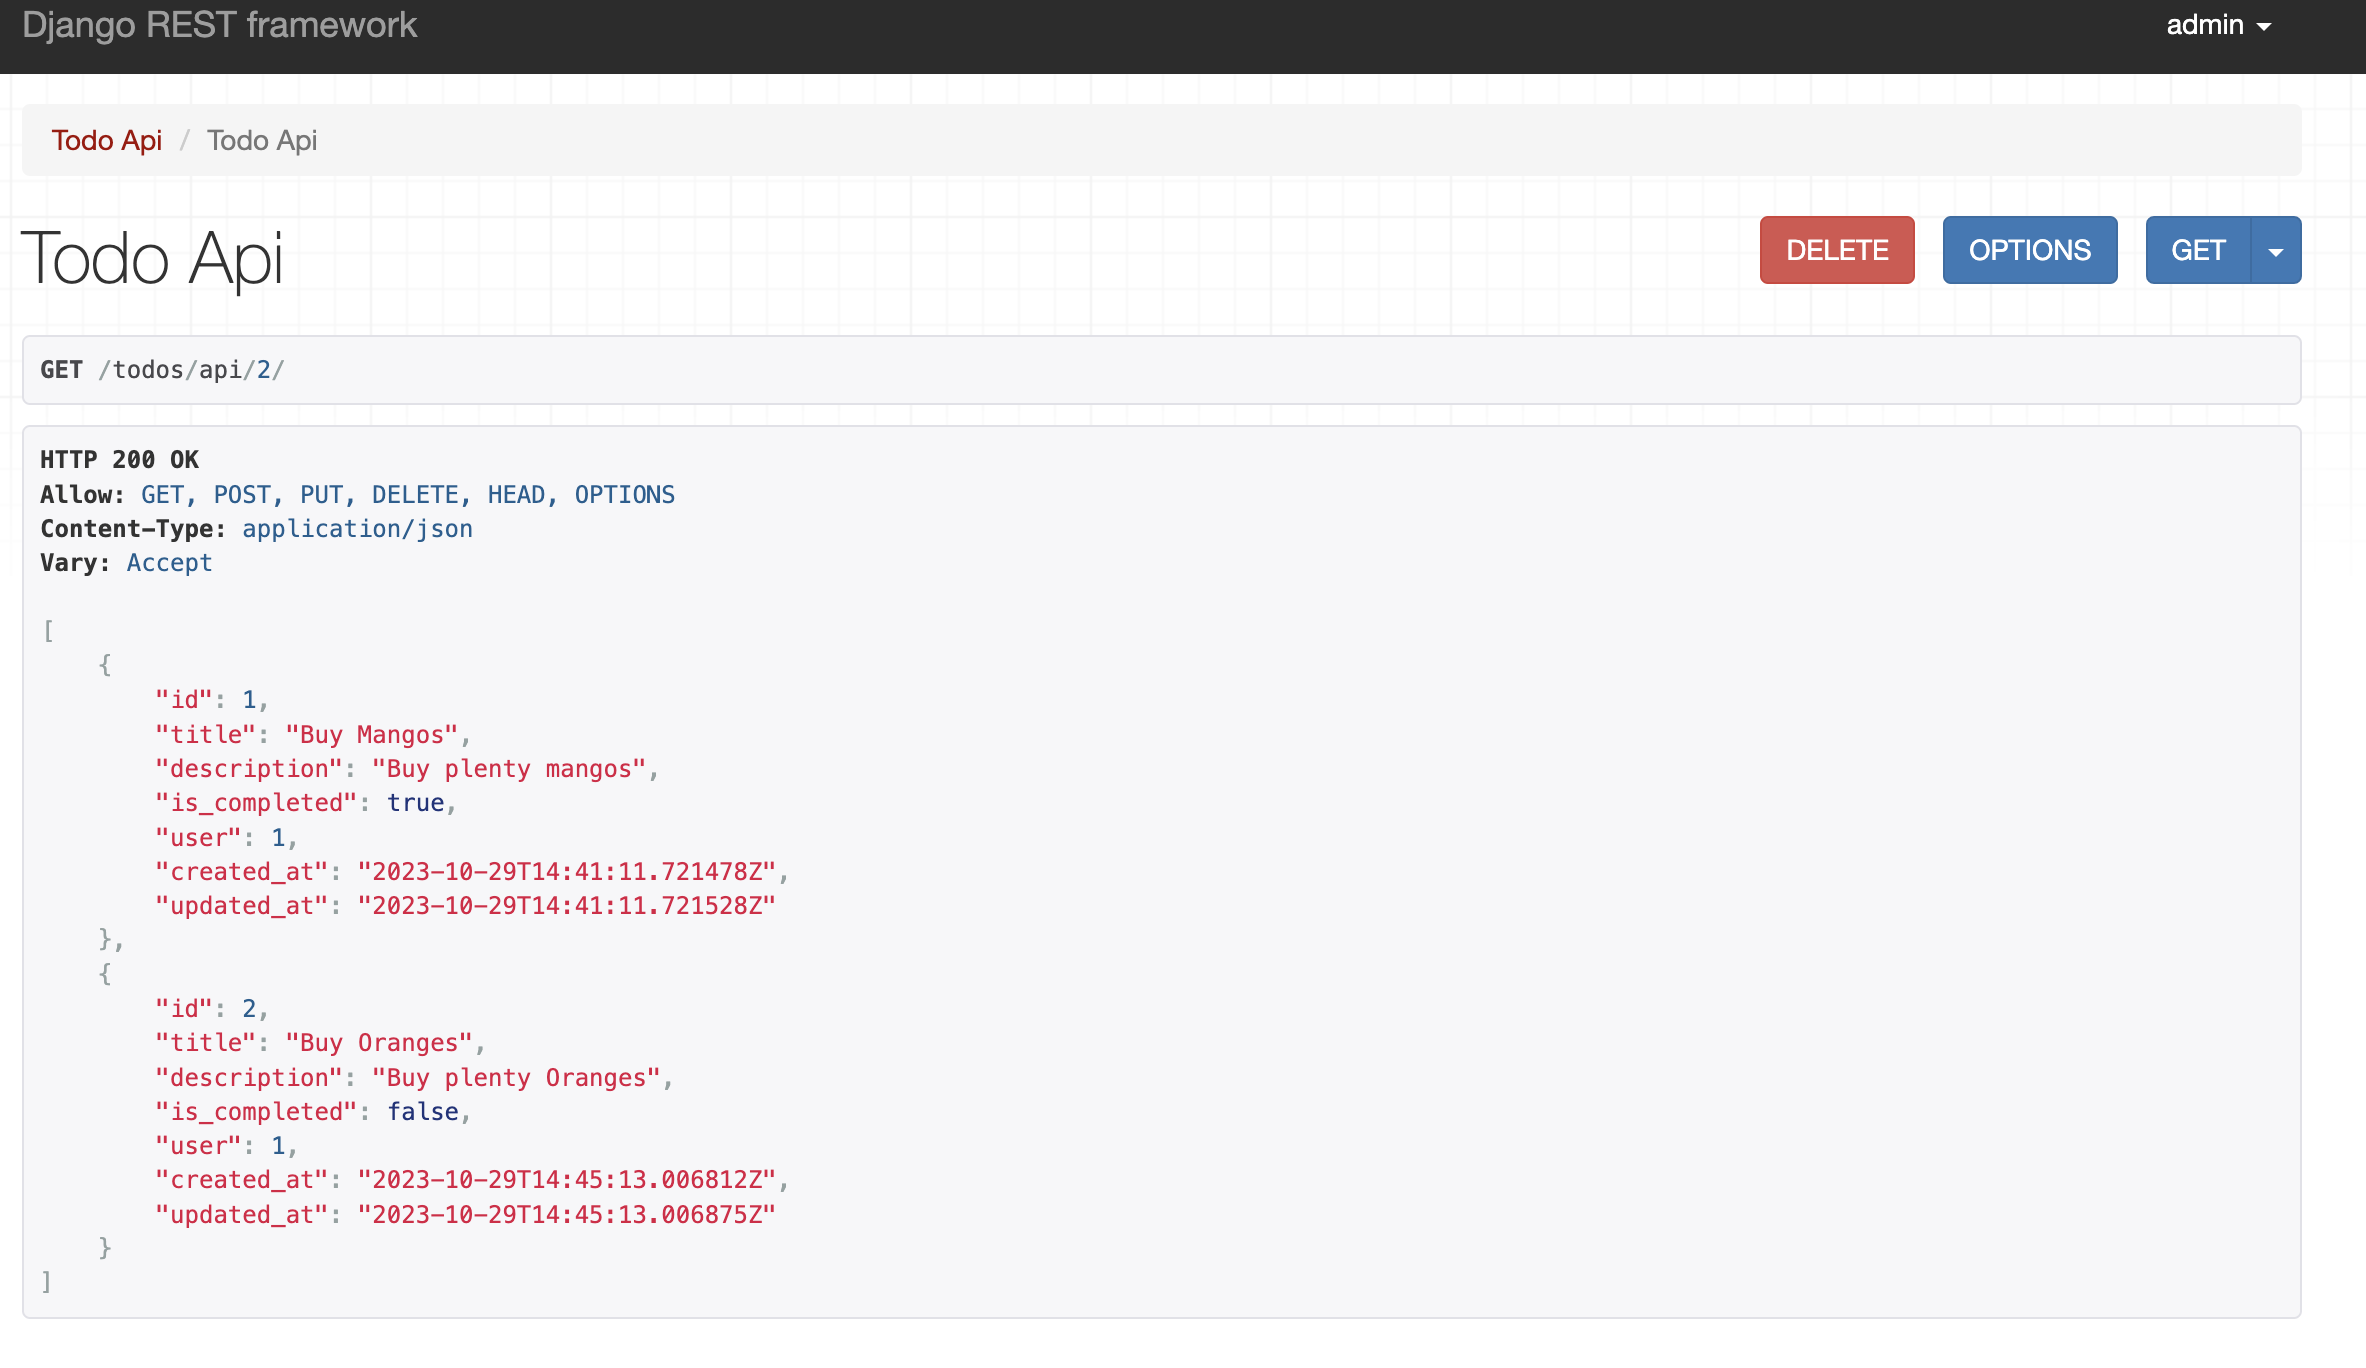
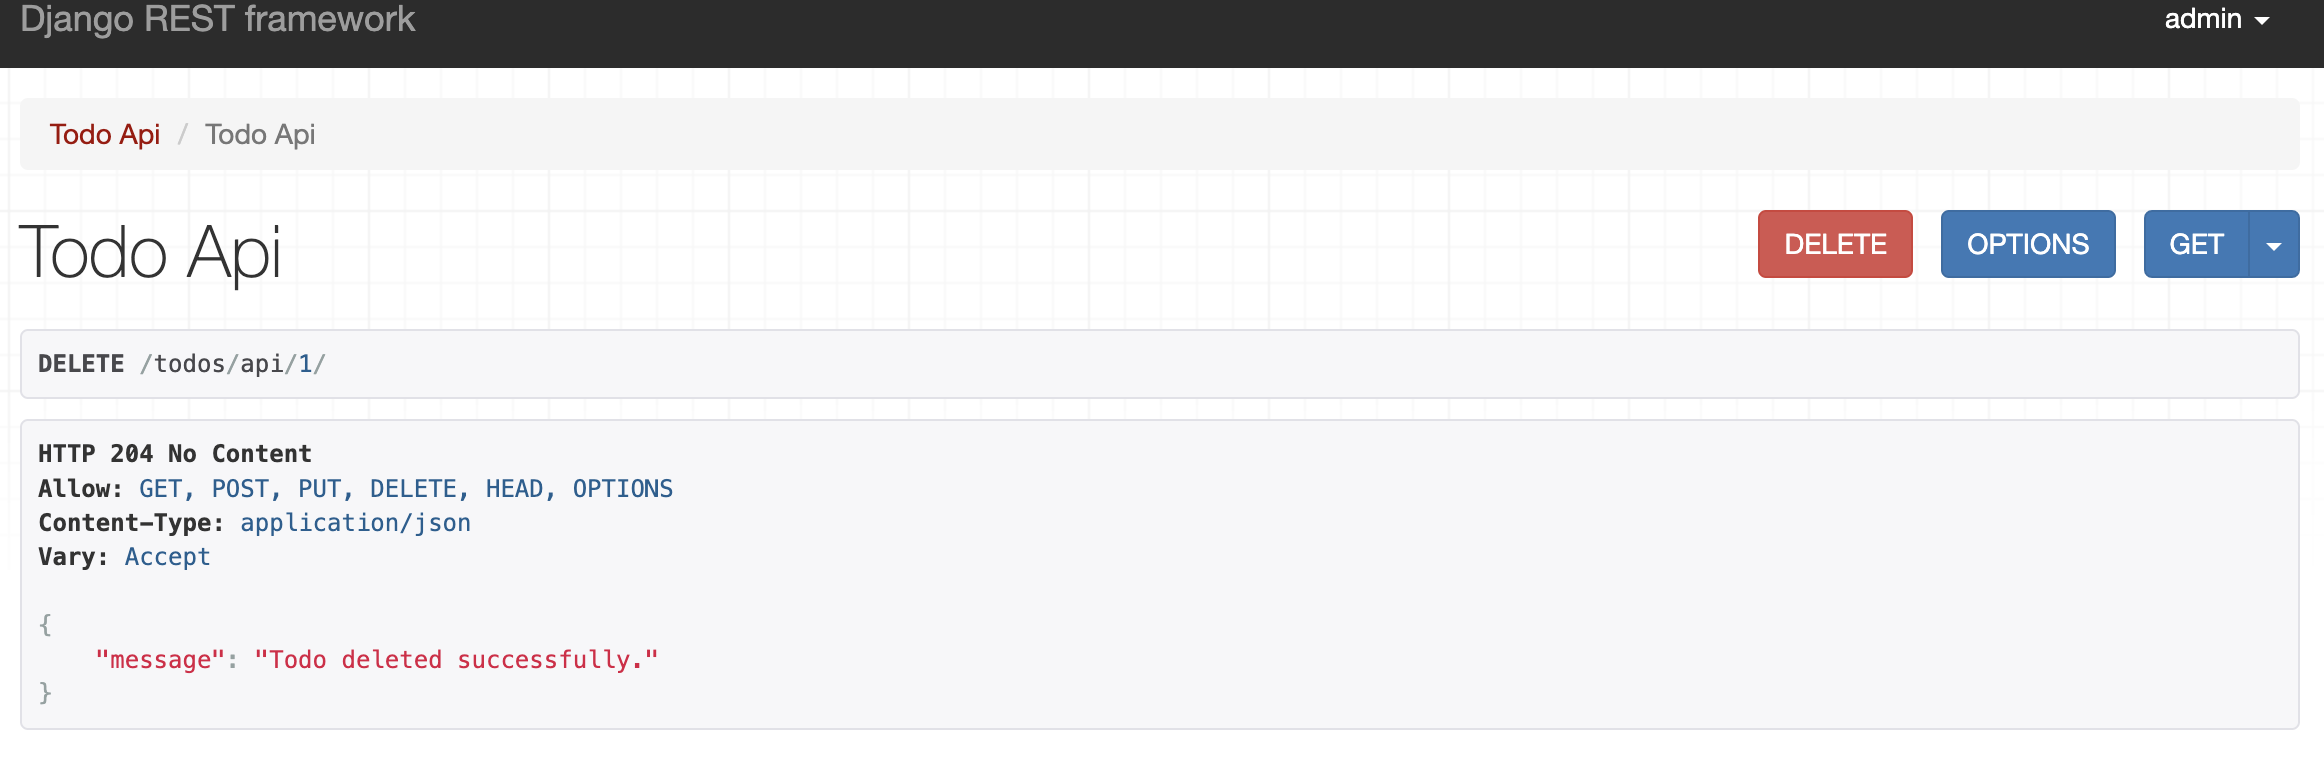
Now we have two items. We can delete todo item with an ID of 1. Visit: http://127.0.0.1:8000/todos/api/1/
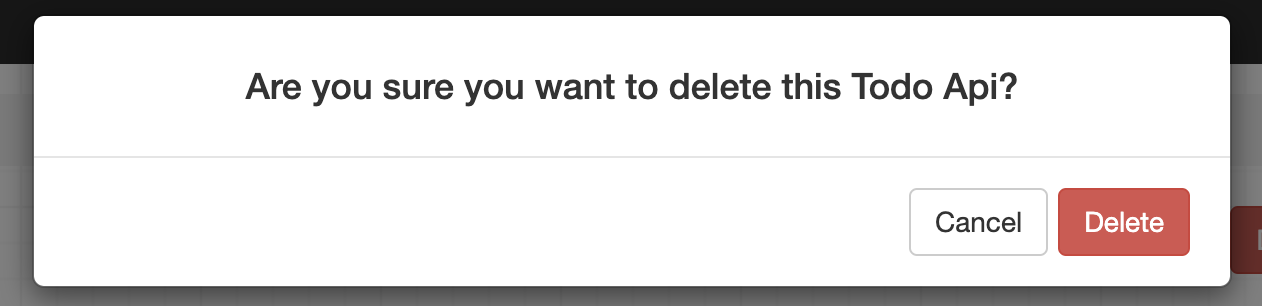
Then click on the DELETE button. You will be prompted to delete the item.
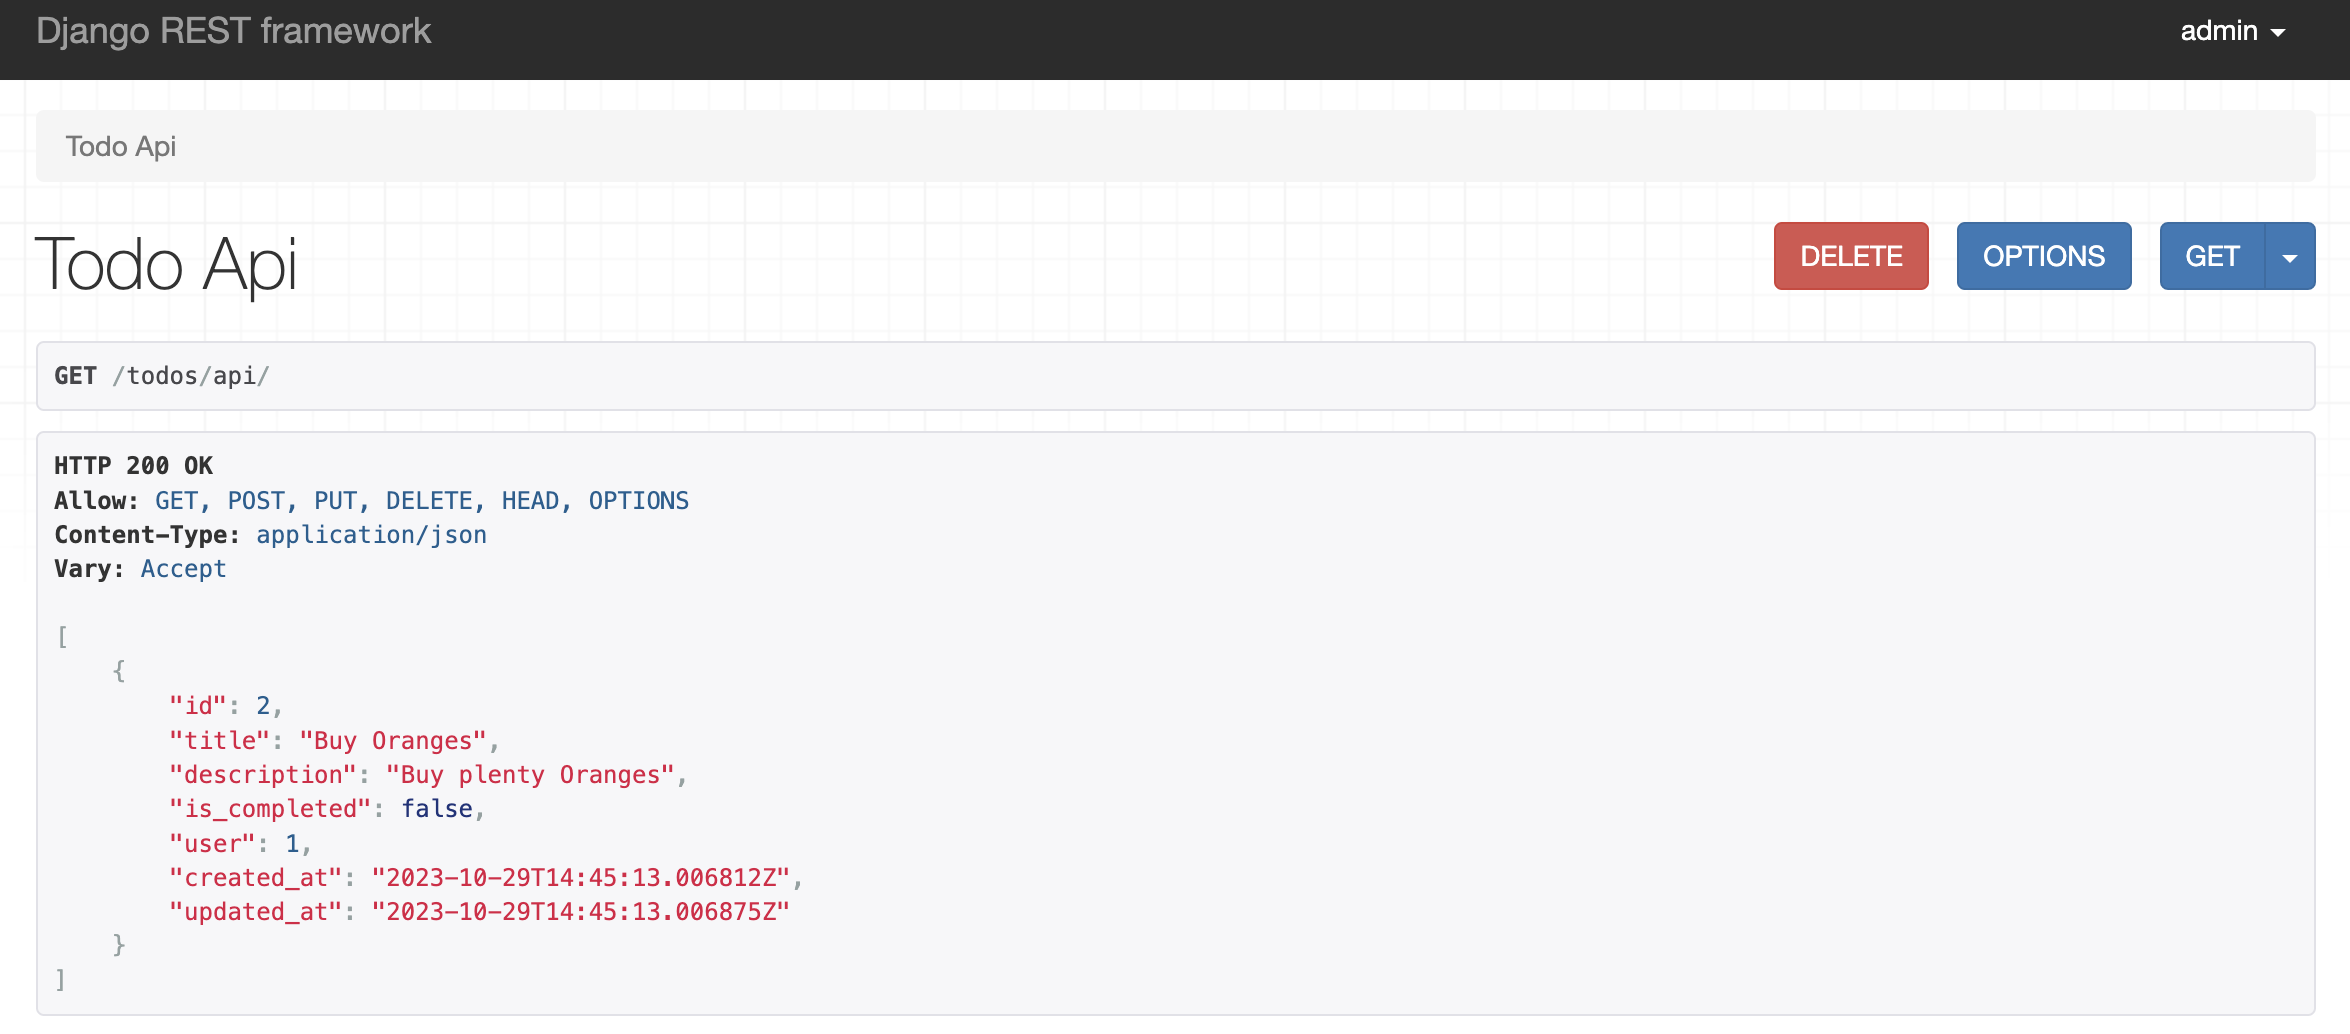
We should now have an updated list below;
You can try the put method yourself.
ModelViewSets
In Django REST Framework, ViewSets are classes that provide a way to manage the logic of an API endpoint based on the HTTP methods (GET, POST, PUT, DELETE, etc.) while significantly reducing the amount of code needed.
The ModelViewSet is a specific type of ViewSet that is tailored to handle CRUD (Create, Retrieve, Update, Delete) operations for a specific model. It automatically generates the required logic for these operations based on the model and serializer provided.
Using ViewSets streamlines the API code, as it binds the methods directly to HTTP actions. The methods (`list`, `retrieve`, `create`, `update`, `partial_update`, and `destroy`) correspond to the HTTP methods `GET`, `POST`, `PUT`, `PATCH`, and `DELETE`, respectively. This makes it easier to create consistent and well-structured APIs with less boilerplate code.
Here is an example of how to use a `ModelViewSet` to achieve the same functionality as before:
from rest_framework import viewsets
from rest_framework.permissions import IsAuthenticated
from .models import Todo
from .serializers import TodoSerializer

class TodoModelViewSet(viewsets.ModelViewSet):
    permission_classes = [IsAuthenticated]
    serializer_class = TodoSerializer
    queryset = Todo.objects.all()
This `TodoModelViewSet` class, when registered with Django's URL patterns, will automatically create the necessary CRUD API endpoints based on the `Todo` model and `TodoSerializer`. It handles all the actions (list, retrieve, create, update, partial update, destroy) without needing to write explicit methods for each HTTP action. This condenses the API view logic and simplifies the overall codebase.
Our views would look like below;
# todo/views.py
from rest_framework import viewsets, status
from rest_framework.response import Response
from rest_framework.permissions import IsAuthenticated
from .models import Todo
from .serializers import TodoSerializer

class TodoModelViewSet(viewsets.ModelViewSet):
    permission_classes = [IsAuthenticated]
    serializer_class = TodoSerializer
    queryset = Todo.objects.all()

    def get_queryset(self):
        return Todo.objects.all().filter(user=self.request.user)

    def perform_create(self, serializer):
        serializer.save(user=self.request.user)

    def update(self, request, *args, **kwargs):
        partial = kwargs.pop('partial', False)
        instance = self.get_object()
        self.check_object_permissions(request, instance) # add this
        if instance.user != request.user:
            return Response
        serializer = self.get_serializer(instance, data=request.data, partial=partial)
        serializer.is_valid(raise_exception=True)
        self.perform_update(serializer)

        if getattr(instance, '_prefetched_objects_cache', None):
            # If 'prefetch_related' has been applied to a queryset, we need to
            # forcibly invalidate the prefetch cache on the instance.
            instance._prefetched_objects_cache = {}

        return Response(serializer.data)

    def destroy(self, request, *args, **kwargs):
        instance = self.get_object()
        self.check_object_permissions(request, instance) # add this
        self.perform_destroy(instance)
        return Response(status=status.HTTP_204_NO_CONTENT)
Then update the urls.py to look like below;
# todo/urls.py
from django.urls import path, include
from rest_framework.routers import DefaultRouter
from .views import TodoModelViewSet

router = DefaultRouter()
router.register(r'api', TodoModelViewSet, basename='todo')

urlpatterns = [
    path("", include(router.urls)),
]
You can now visit the endpoint and try it out. It's advantageos and the ui comes with html form as well.
Conclusion
Django REST Framework provides a robust framework for building powerful APIs in Python. From handling various HTTP methods to seamlessly managing endpoints, it streamlines the process of creating RESTful APIs, allowing developers to focus on business logic rather than repetitive boilerplate code. Through the utilization of ViewSets, especially the ModelViewSet, the efficiency and organization of API development are significantly improved, promoting cleaner and more maintainable code.
The examples showcased the transition from traditional API views to the concise and elegant ModelViewSet, demonstrating how Django's conventions and best practices are leveraged to simplify the API development process. Understanding and implementing these concepts can greatly enhance the efficiency and productivity of web developers, enabling the creation of scalable and sophisticated web applications.
Embracing Django REST Framework's ViewSets offers an opportunity to create standardized, comprehensive APIs, resulting in enhanced development speed, easier maintenance, and the ability to construct well-structured and powerful endpoints. As a result, developers are equipped with a powerful tool to build sophisticated and efficient web APIs with Django.

Experienced DevOps Engineer proficient in Python, Docker, Kubernetes, CI/CD, and cloud technologies. Specialized in automating processes and building scalable infrastructure for seamless development and deployment.